1. WHAT IS PWA AND HOW DOES IT HELP US IN REVO SOLO? 2. HOW TO CONFIGURE THE PWA 3. HOW TO INSTALL THE PWA
1. WHAT IS PWA AND HOW DOES IT HELP US IN REVO SOLO?
A PWA (Progressive Web App) is a web application that works similarly to a mobile app, but without the need to download it from the App Store or Google Play. It can be installed directly from the browser, appear on the device's home screen, and function almost like a native app.
With Revo SOLO, your restaurant can offer your customers its own personalized app on their mobile:
1. Personalized logo: upload the logo you want to appear on the home screen.
2. App title: define the name the user will see when installing the app.
This way, each restaurant can have its own personalized app directly on its customers' mobiles.
The application can be installed on both Android and iPhone (iOS) devices, directly from the phone's browser.
Advantages of using PWA IN REVO SOLO
-
Quick and direct installation from the browser.
-
Native app appearance: opens in full screen.
-
Full customization: you can define the logo and the app name that customers will see on their mobile.
-
Customer loyalty, as they will see the app directly on their mobile and can easily return.
2. HOW TO CONFIGURE THE PWA
In Revo SOLO, the PWA functionality can be configured both for each individual establishment and for general SOLO links. Below is a step-by-step guide on how to do it.
PWA Configuration per establishment
- 1. Access the SOLO profiles and select the profile you wish to edit.

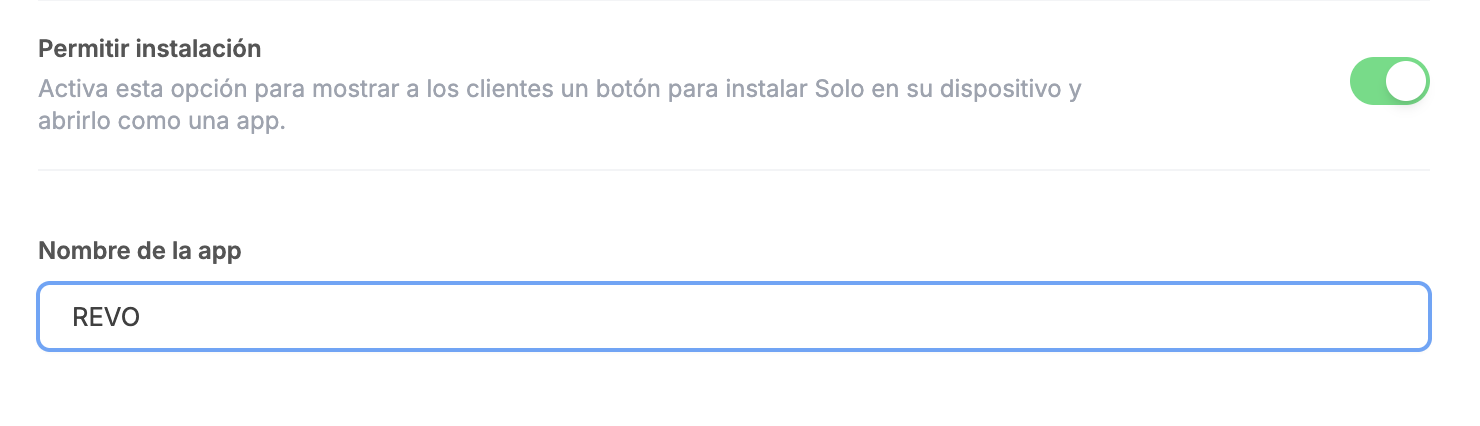
- 2. Activate the Allow installation option and indicate a name for the app.
By checking this box, customers will be allowed to install the establishment's app on their devices.
After activating the previous option, the “App name” field will appear just below. This name will be what customers see when they install the app on their device.
-
3. Associate the profile with an establishment.
- 3.1 Go to the Establishments section in the Revo SOLO back-office.
- 3.2 Edit the corresponding establishment.
- 3.3 Click on the Configuration section .
- 3.4 Associate the SOLO profile you previously configured.
-
4. Configure the app logo. The logo that will appear on the installed app is the one defined in Appearance.
It is possible to have a different appearance for each establishment by editing each one. Simply after configuring the appearance with the logo, you must associate the appearance with the corresponding establishment.
With these steps, each establishment will have its personalized PWA, with a specific logo and name that customers will see when installing the app.
PWA Configuration for general SOLO links
In addition to configuring it per establishment, Revo SOLO allows you to activate the PWA for general SOLO links, ensuring that users can install the app even if it is not a specific establishment.
-
1. Access the SOLO profiles.
-
2. Click the gear icon located at the top right of the screen and activate the Allow installation check . When activating this option, a new field will open below to define the name of the app the customer will see when installing it.
This configuration allows offering the PWA on general Revo SOLO links, so that any customer can install the app and then choose the establishment where they want to place their order.
Summary
- Per establishment: activate Allow installation in the Solo profile, configure the app name, configure the logo in the appearance section, and finally associate the solo profile and the appearance with the corresponding establishment.
- For general links: activate Allow installation in the "Solo" section by clicking and define the app name.
- Logo: always managed from the Appearance section and can be different per establishment.
In this way, Revo SOLO allows offering a fully personalized PWA experience, both at the establishment level and the general platform level.
3. HOW TO INSTALL THE PWA
Once the PWA functionality is configured and the SOLO link is shared (whether from a specific establishment or the general SOLO links), customers can install the application directly on their mobile device without having to download it from an app store.
When a customer accesses one of these links from their phone, upon entering the main page, they will be shown the option to install the app on their device. If they choose to install it, the application will be added to the mobile's home screen, displaying the logo and name configured for the establishment or SOLO profile.
From that moment on, the customer can access the platform as if it were an app, directly from the icon on their home screen.
The installation process may vary slightly depending on the device or browser used. The different scenarios are explained below, and screenshots are provided so that customers can follow the steps correctly.
Individual establishment links
For customers to install the app for a specific establishment, it is necessary to provide them with one of the SOLO links associated with that establishment.
-
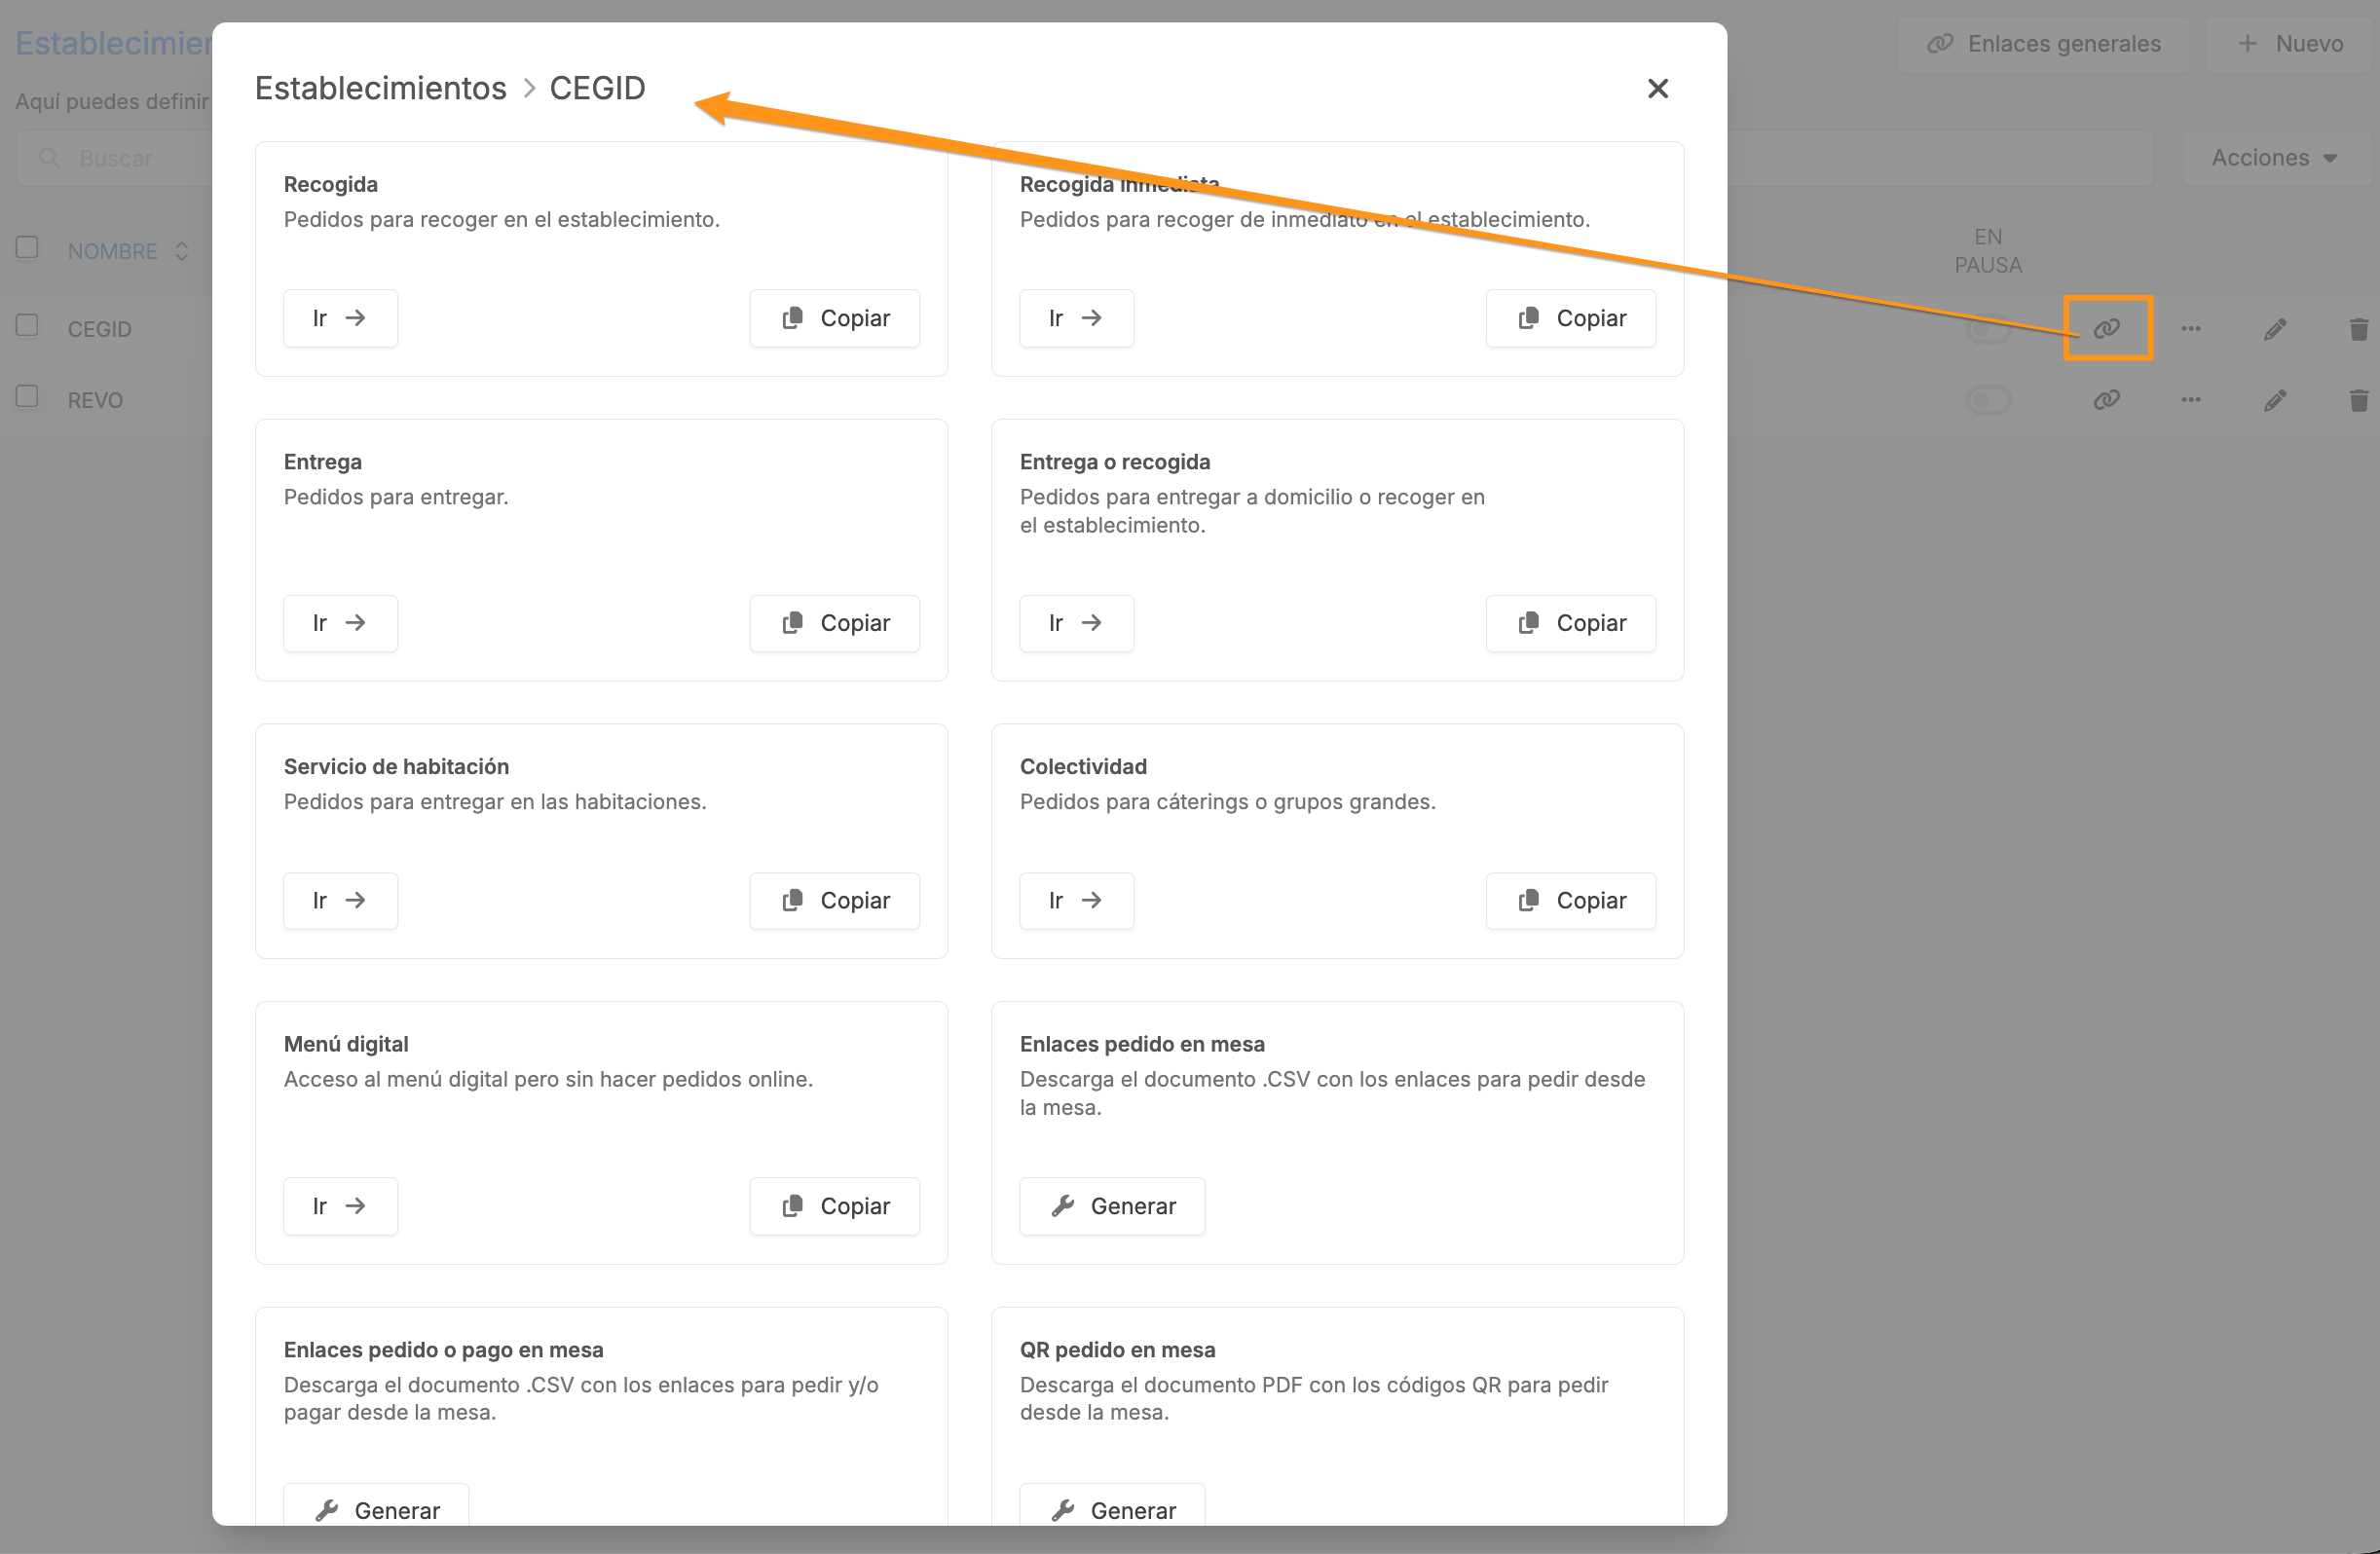
1. Access the Establishments section of the Revo SOLO back-office.
-
2. Select the corresponding establishment and click on the Links section to see all its available links.
Each of these links will allow the customer to install the PWA and directly access the corresponding functionality of the establishment.
Important: Any SOLO link can be used to install the app, except for "To table" (A mesa) mode links.
General SOLO links
It is also possible to install the PWA from the general Revo SOLO links.
In this case, the customer will access one of the general links and, once inside, can select the establishment from which they want to place their order. From that same access, they will also be offered the option to install the app on their device.
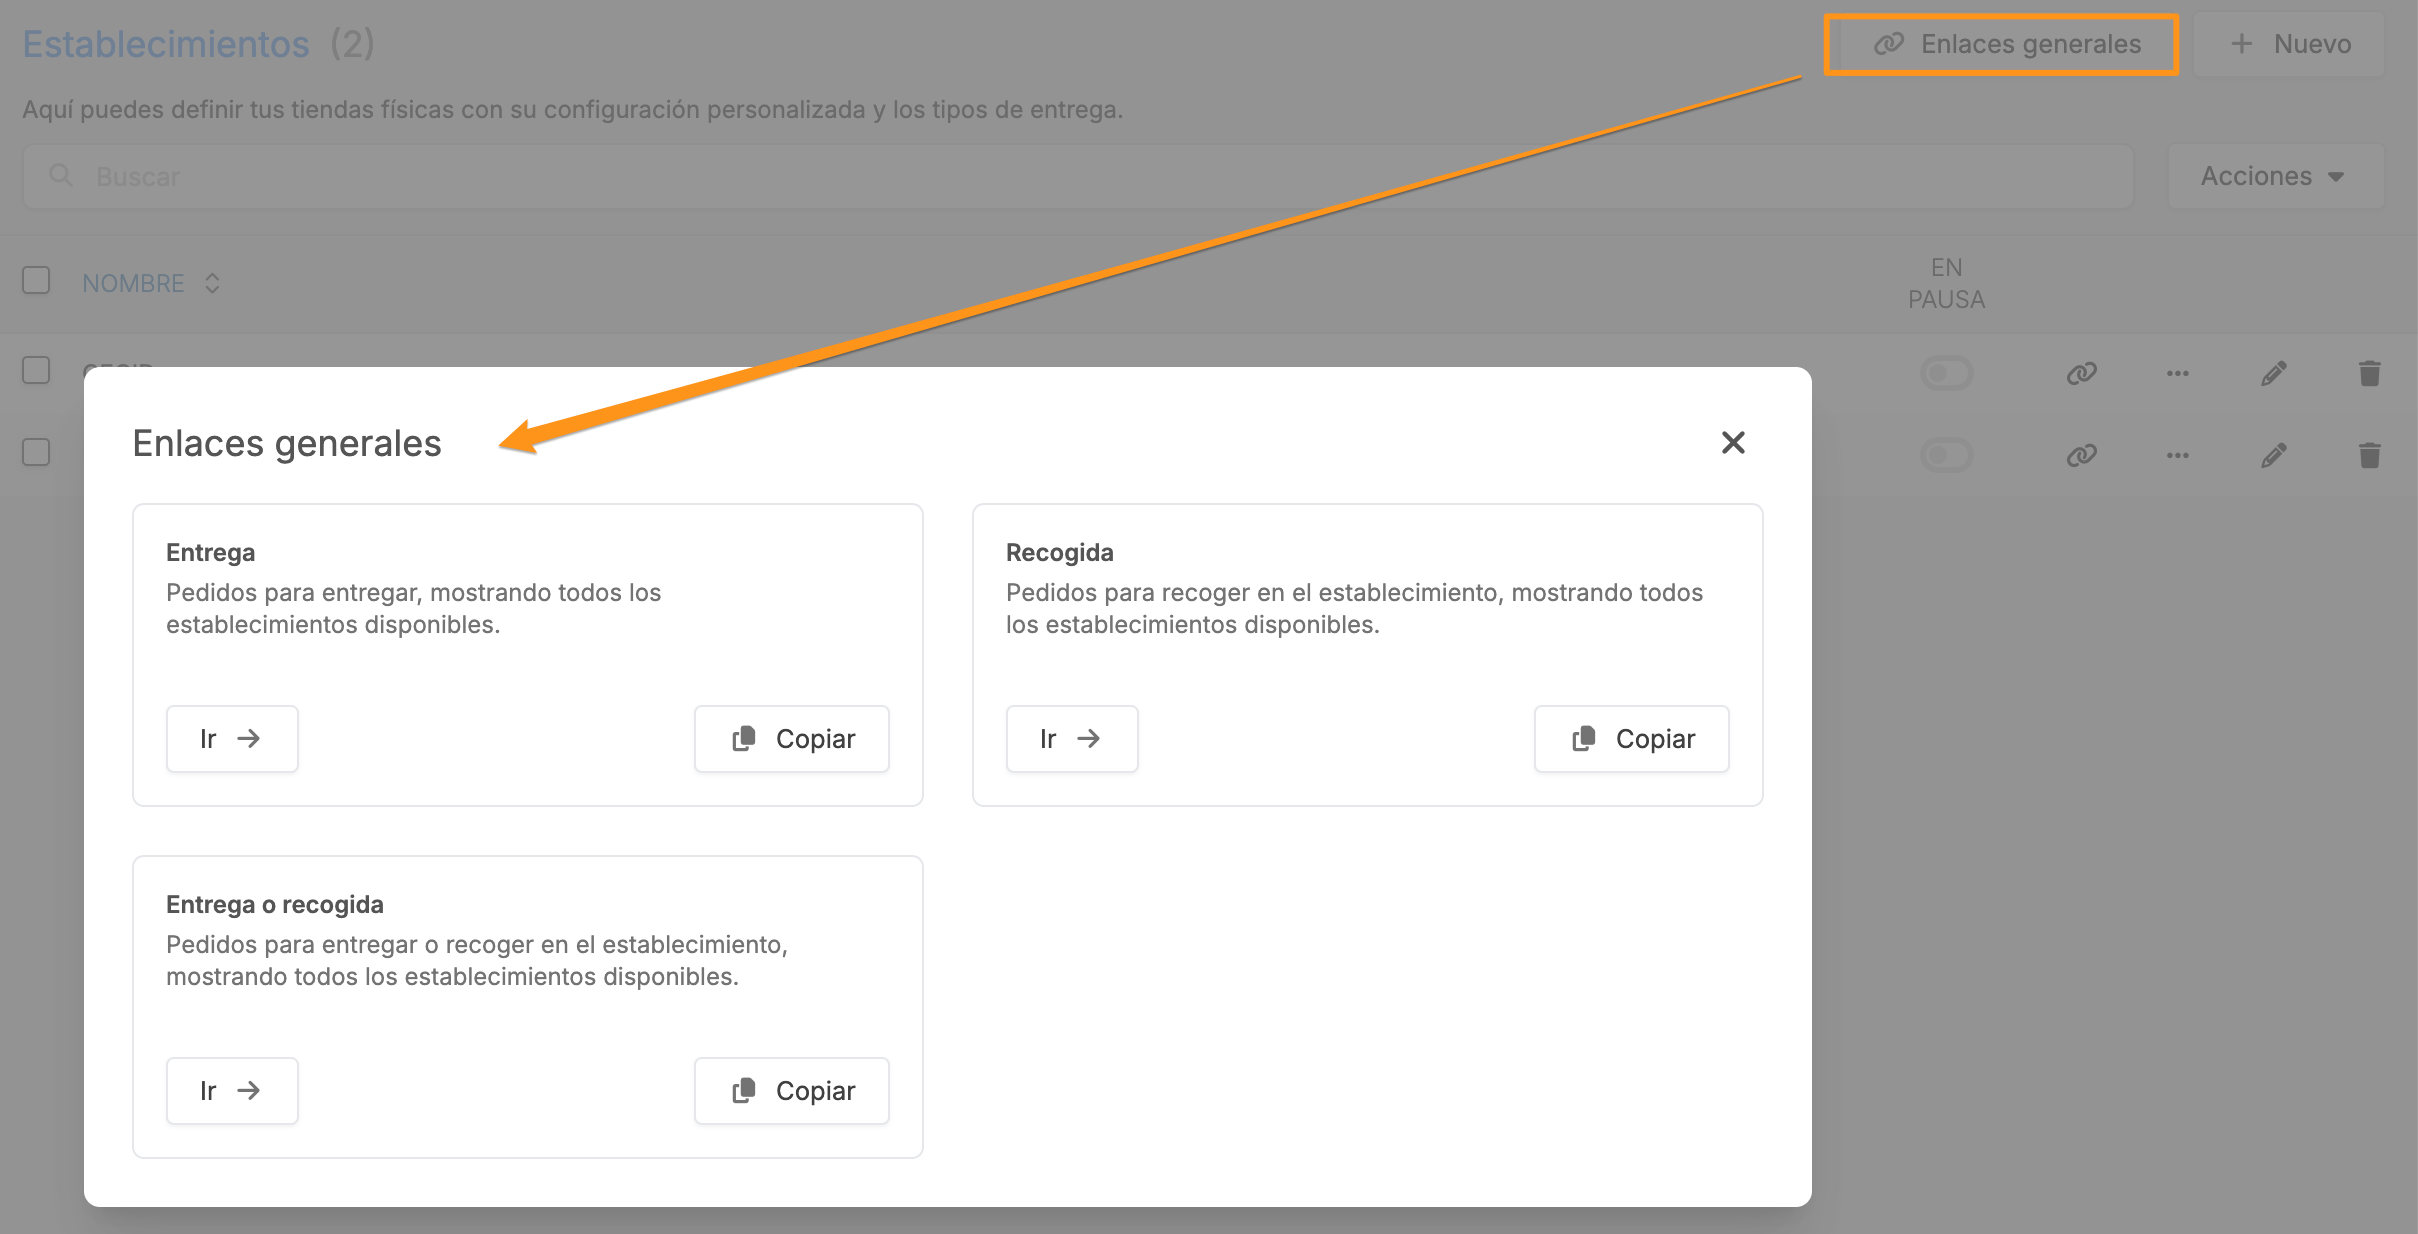
- 1. Go to the Establishments section of the Revo SOLO back-office.
- 2. In the upper right part of the screen, click the General links button.
Once the customer accesses one of these links, they will be offered the option to install the app on their device, allowing them to have access to the platform directly from their home screen and select the desired establishment.
Each SOLO link provides its own application with a specific entry point. For this reason, it is possible to have multiple applications installed for the same establishment or even multiple applications for the same account at a general level. Note that app installation is not available on "To table" (A mesa) mode links.
PWA INSTALLATION PROCESS
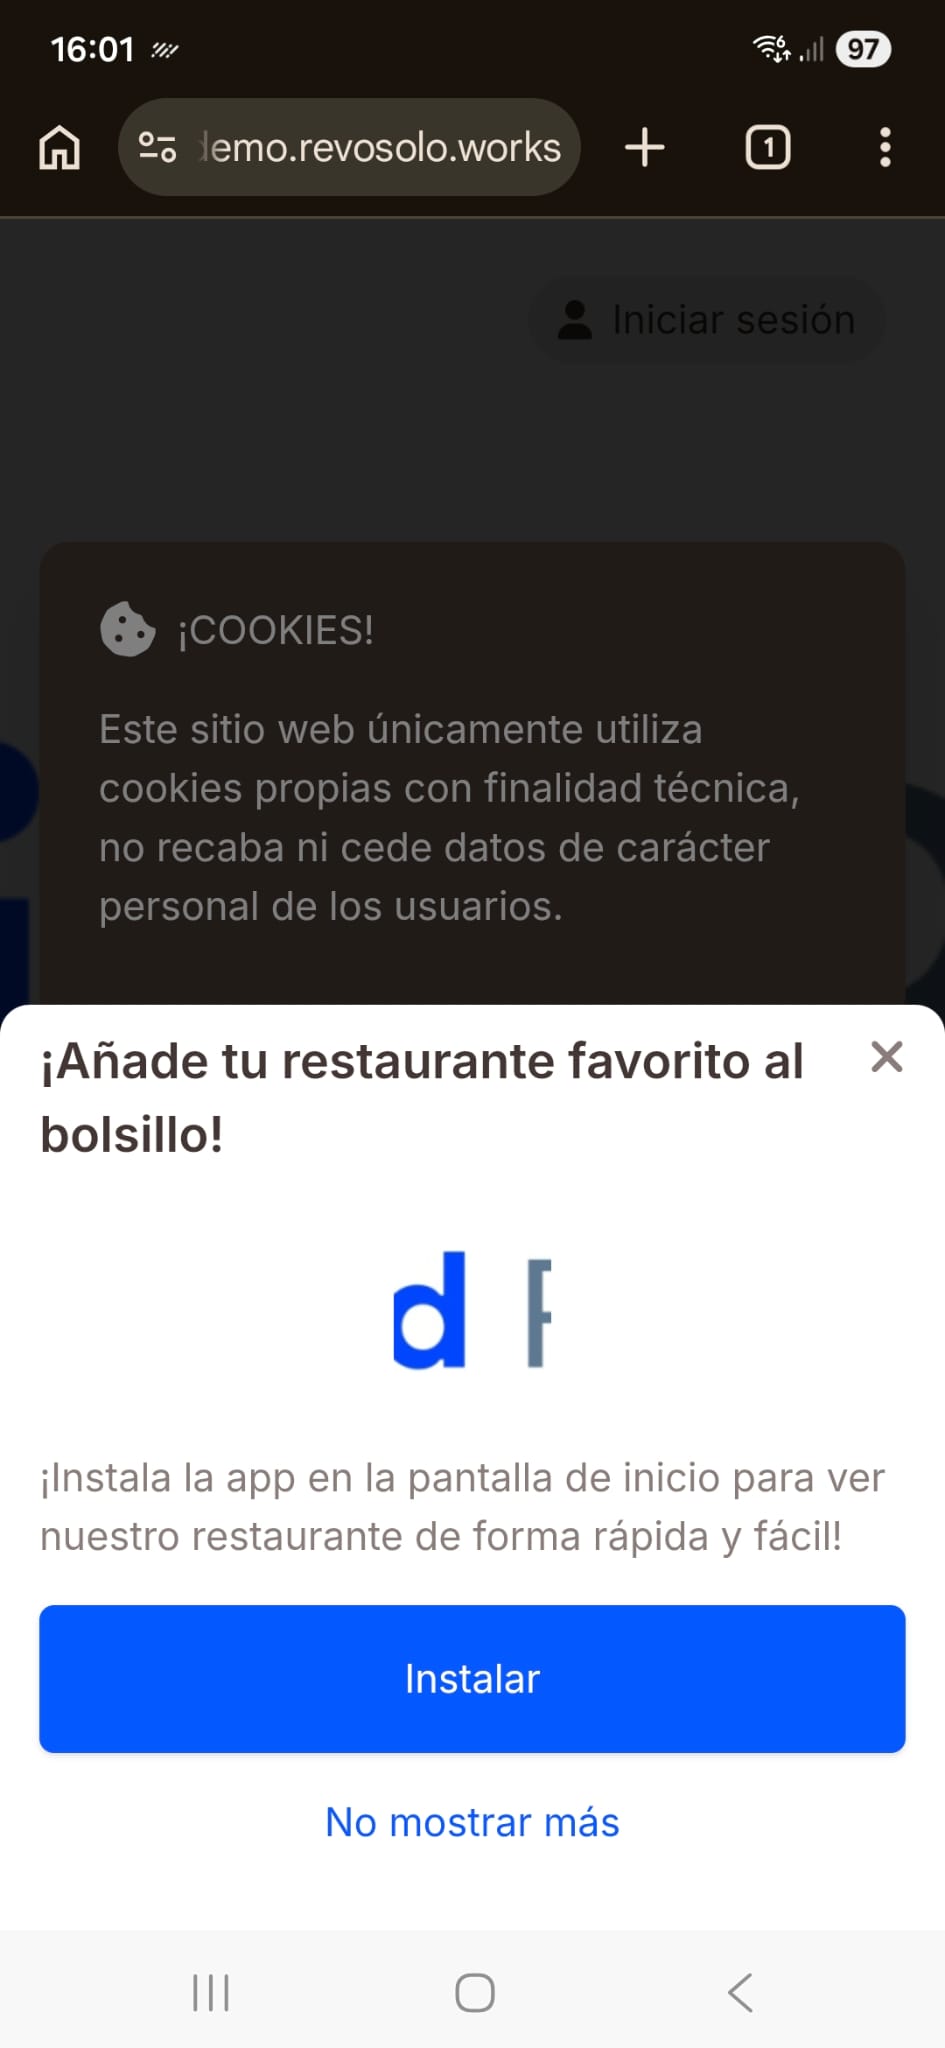
When the customer accesses one of the SOLO links from their mobile device, they will automatically see the following screen, where two options will be shown:
- 1. Install: allows installing the application on the mobile device.
- 2. Don't show again: hides this notice and continues accessing SOLO from the browser.
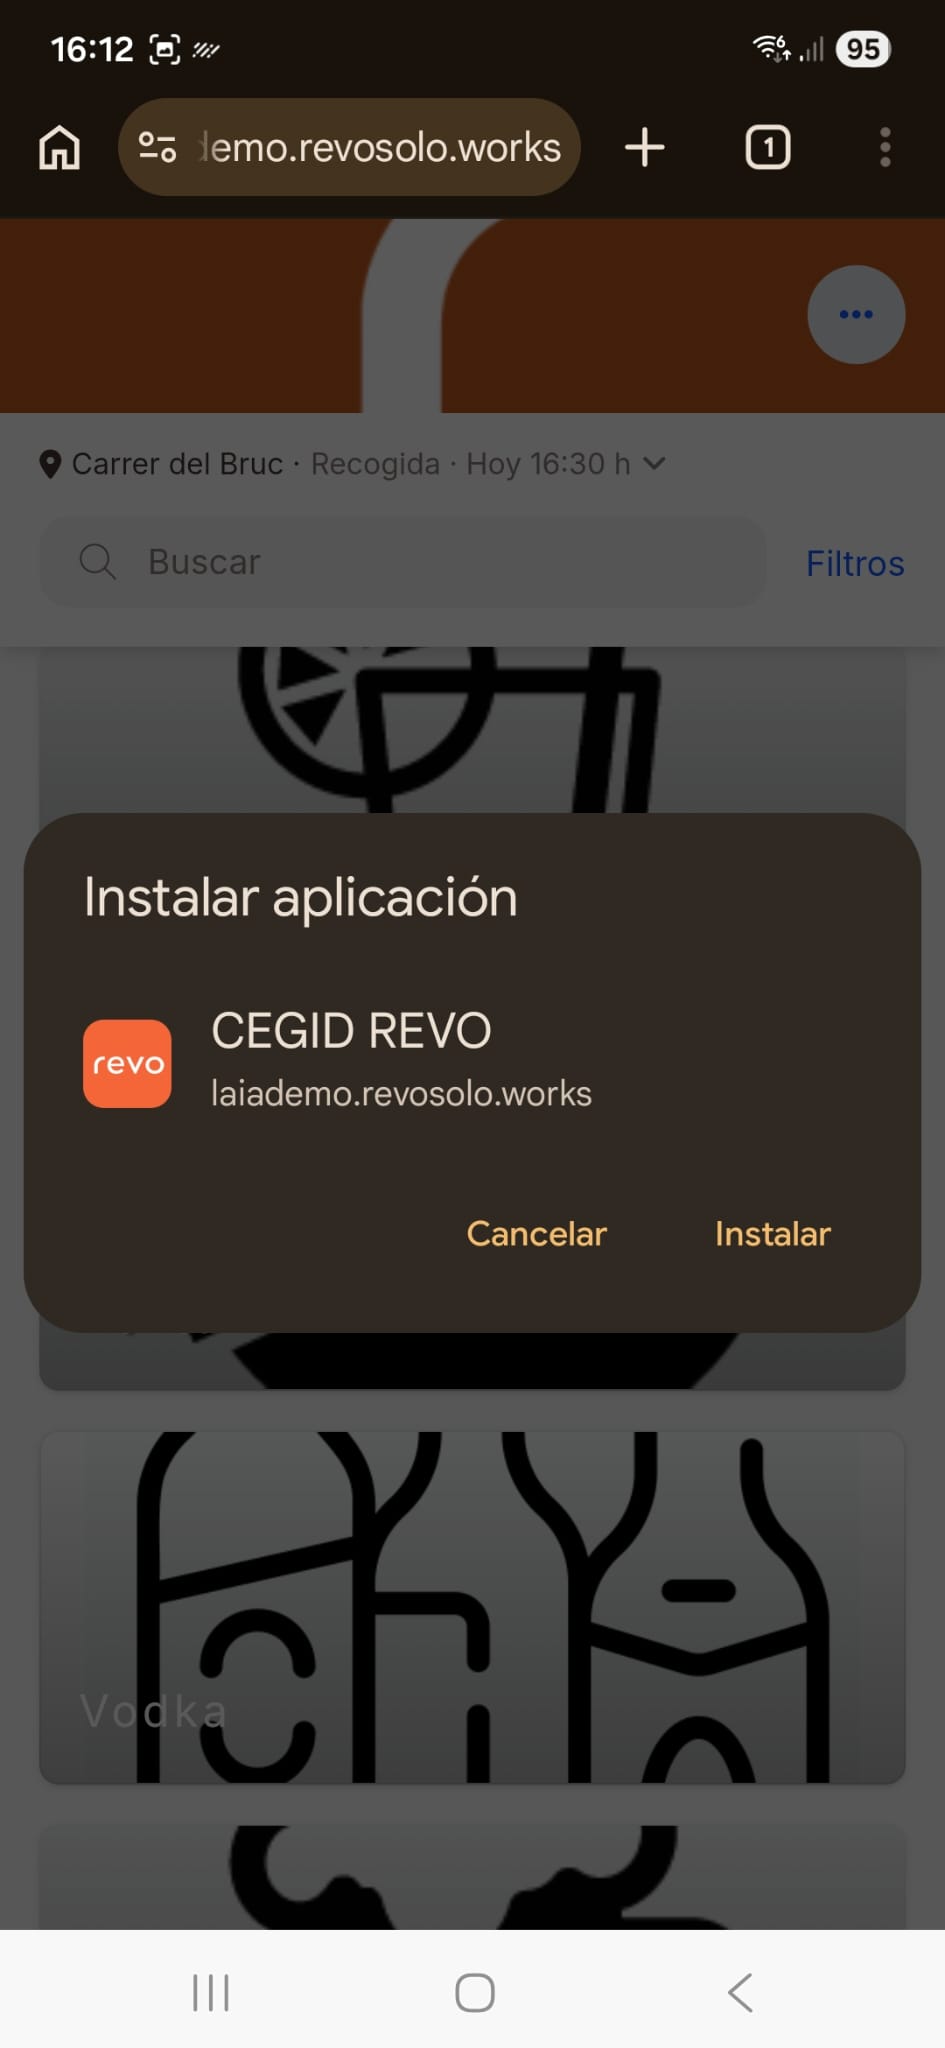
1. If the customer clicks the "Install" button, a new window will appear to confirm the action:
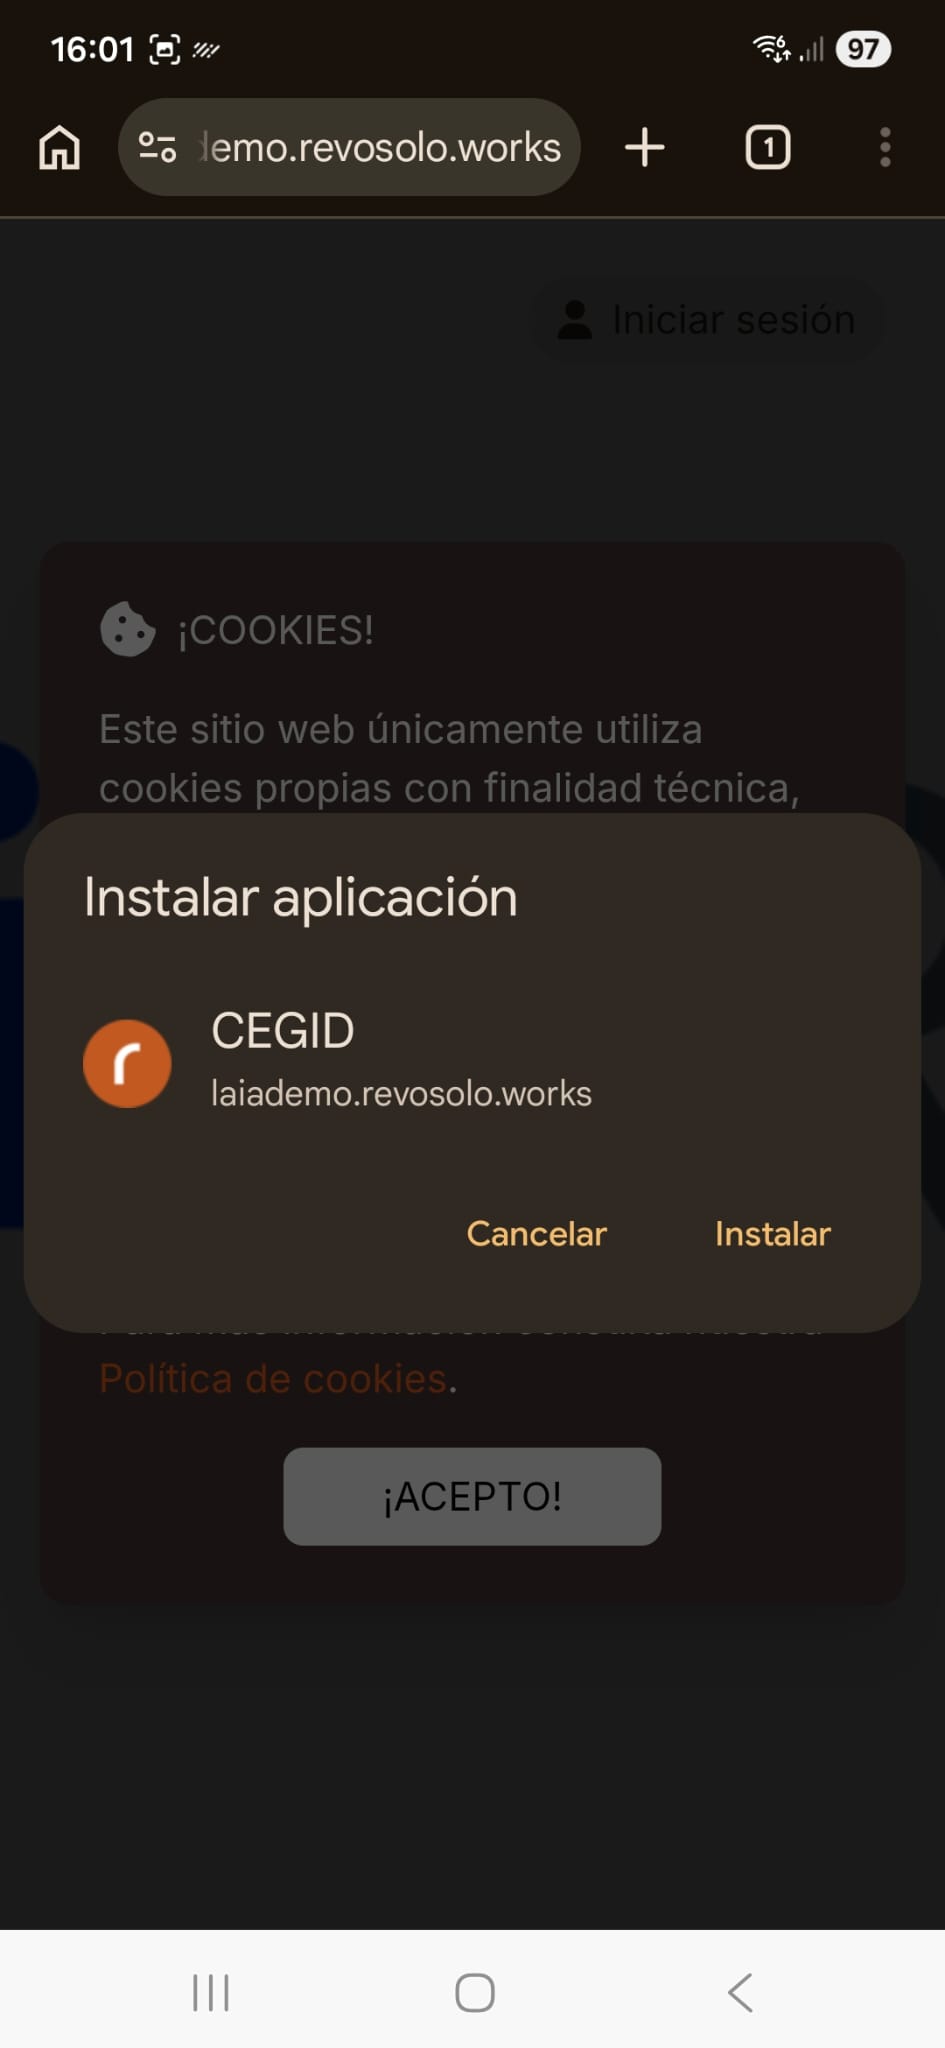
After clicking "Install", the app will have been successfully installed on their device and they can access it at any time:
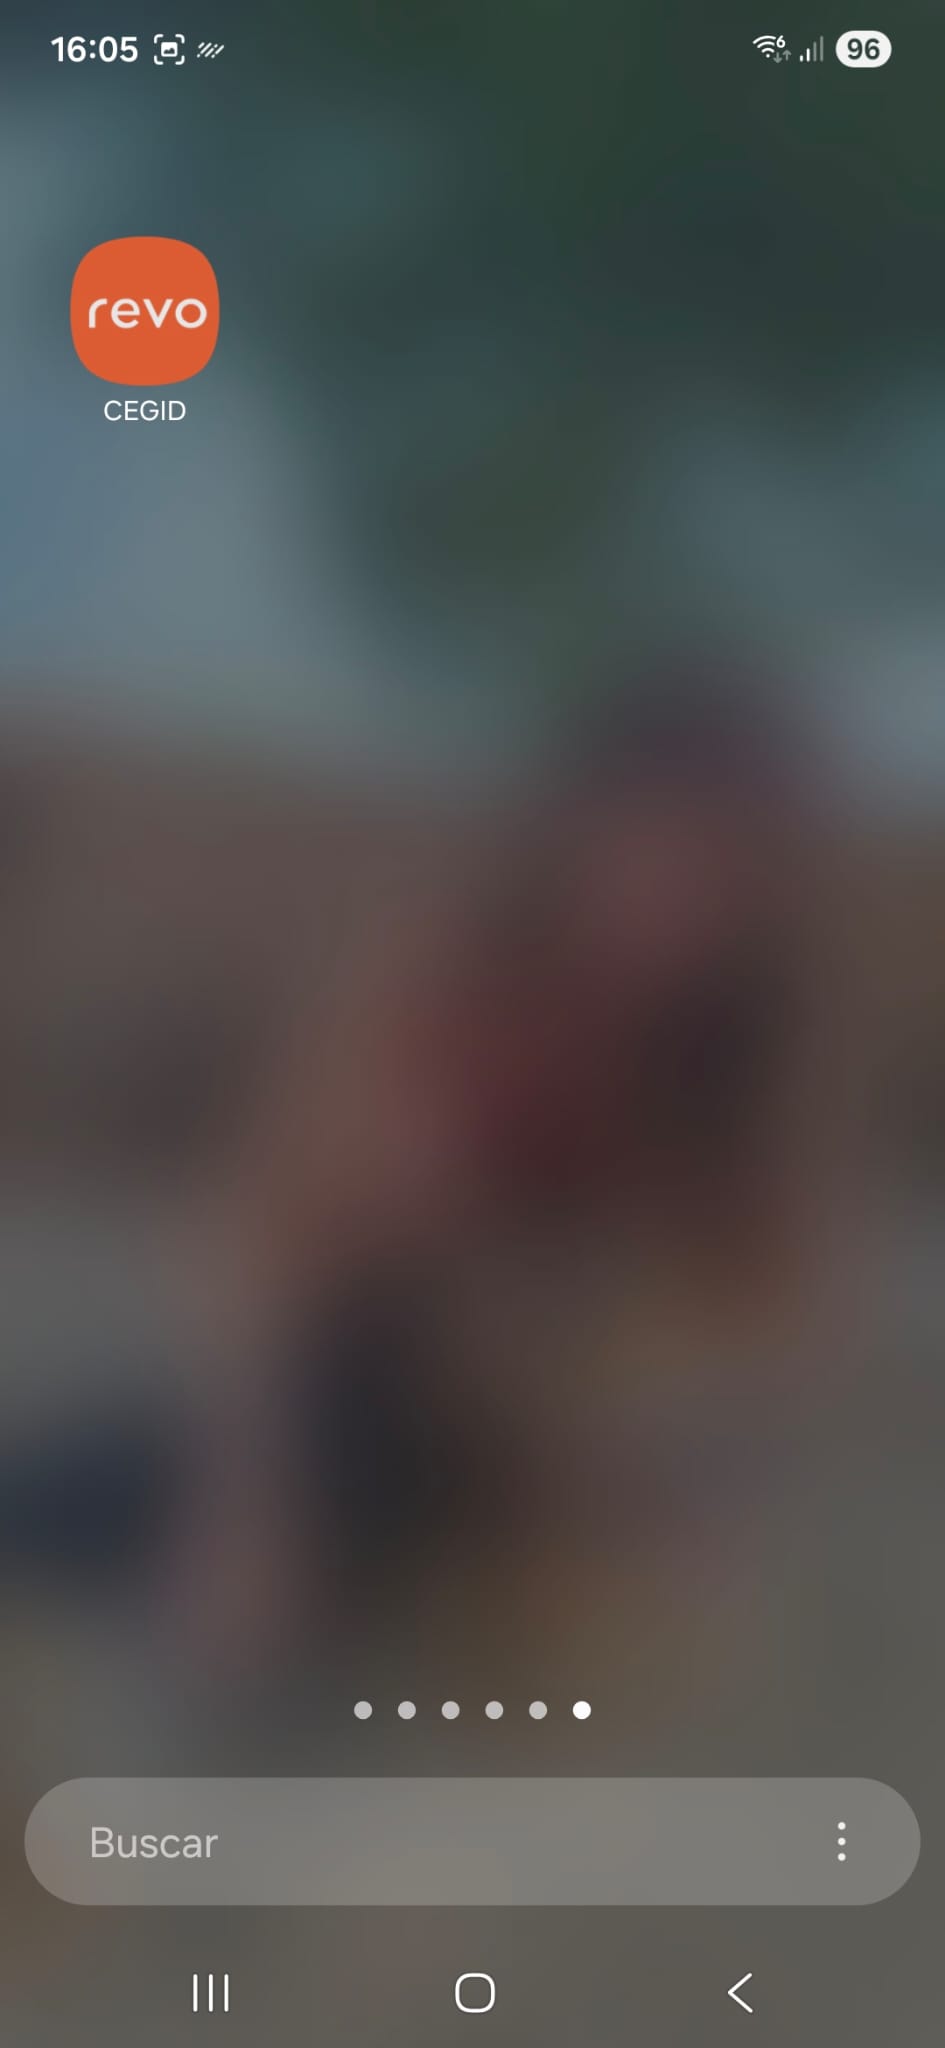
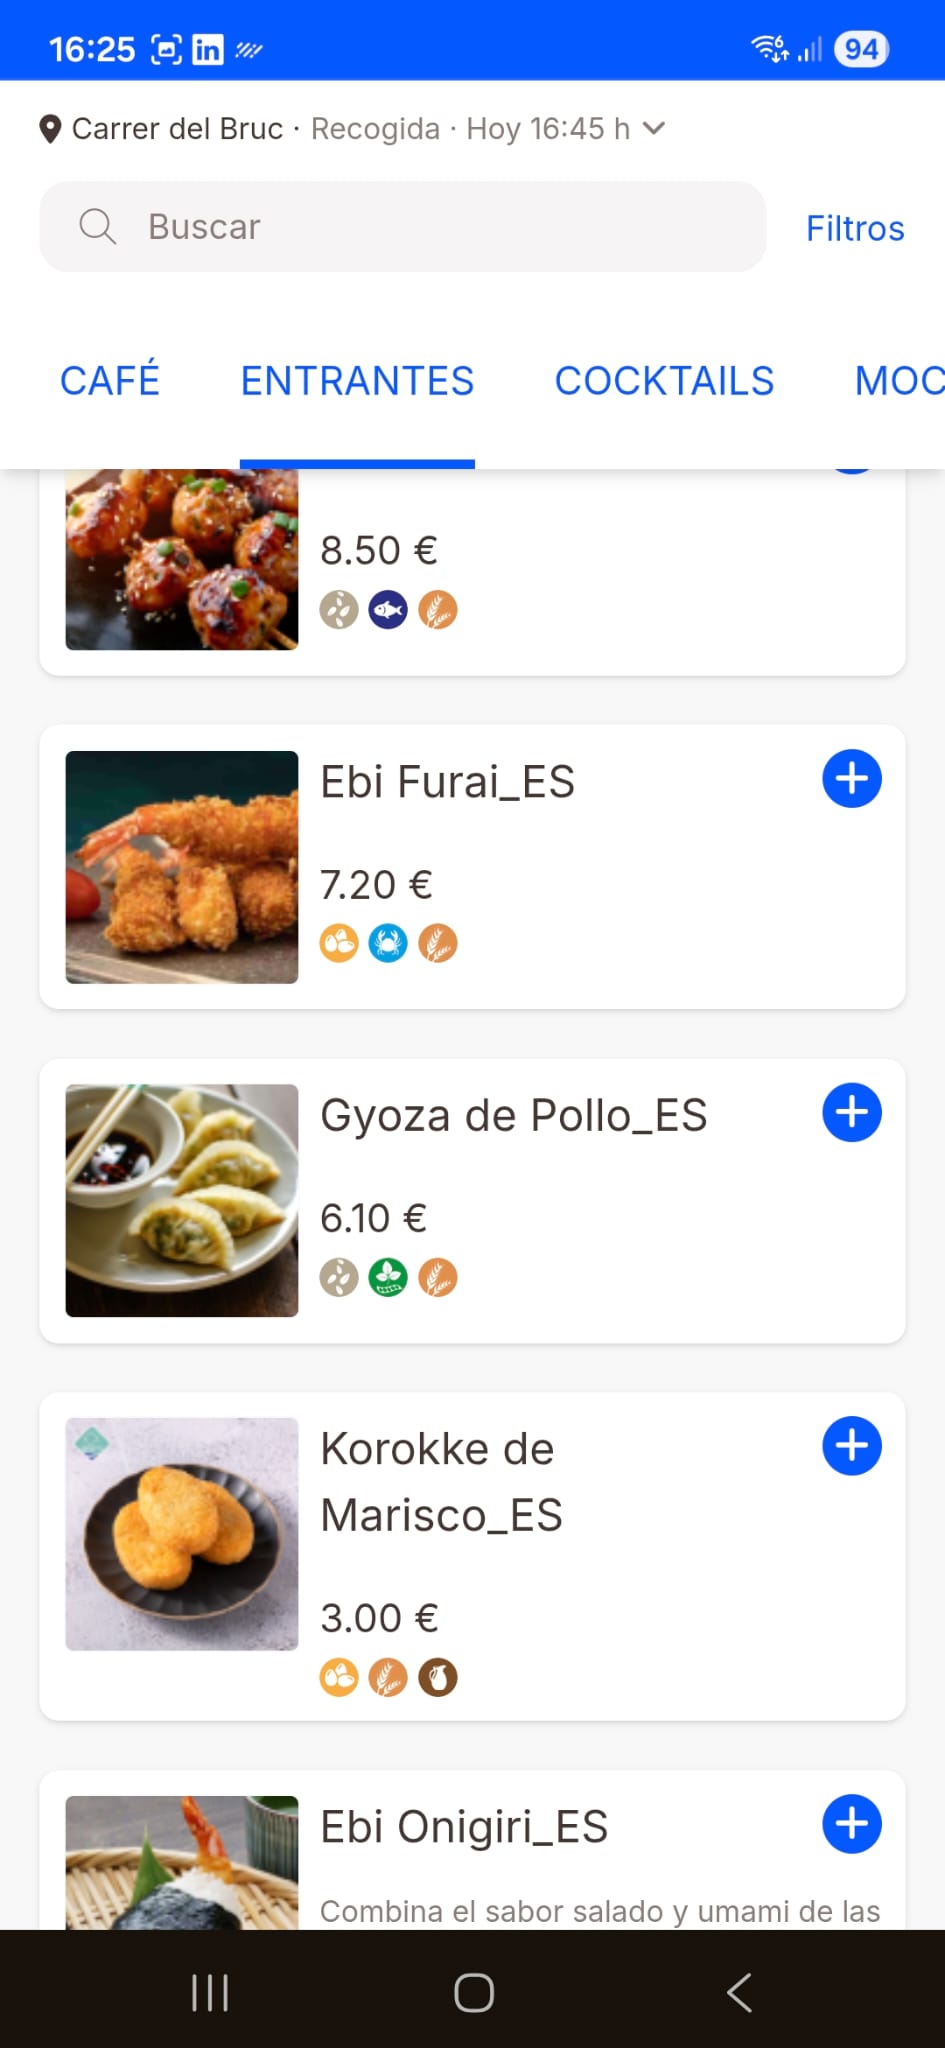
The customer opens the application:

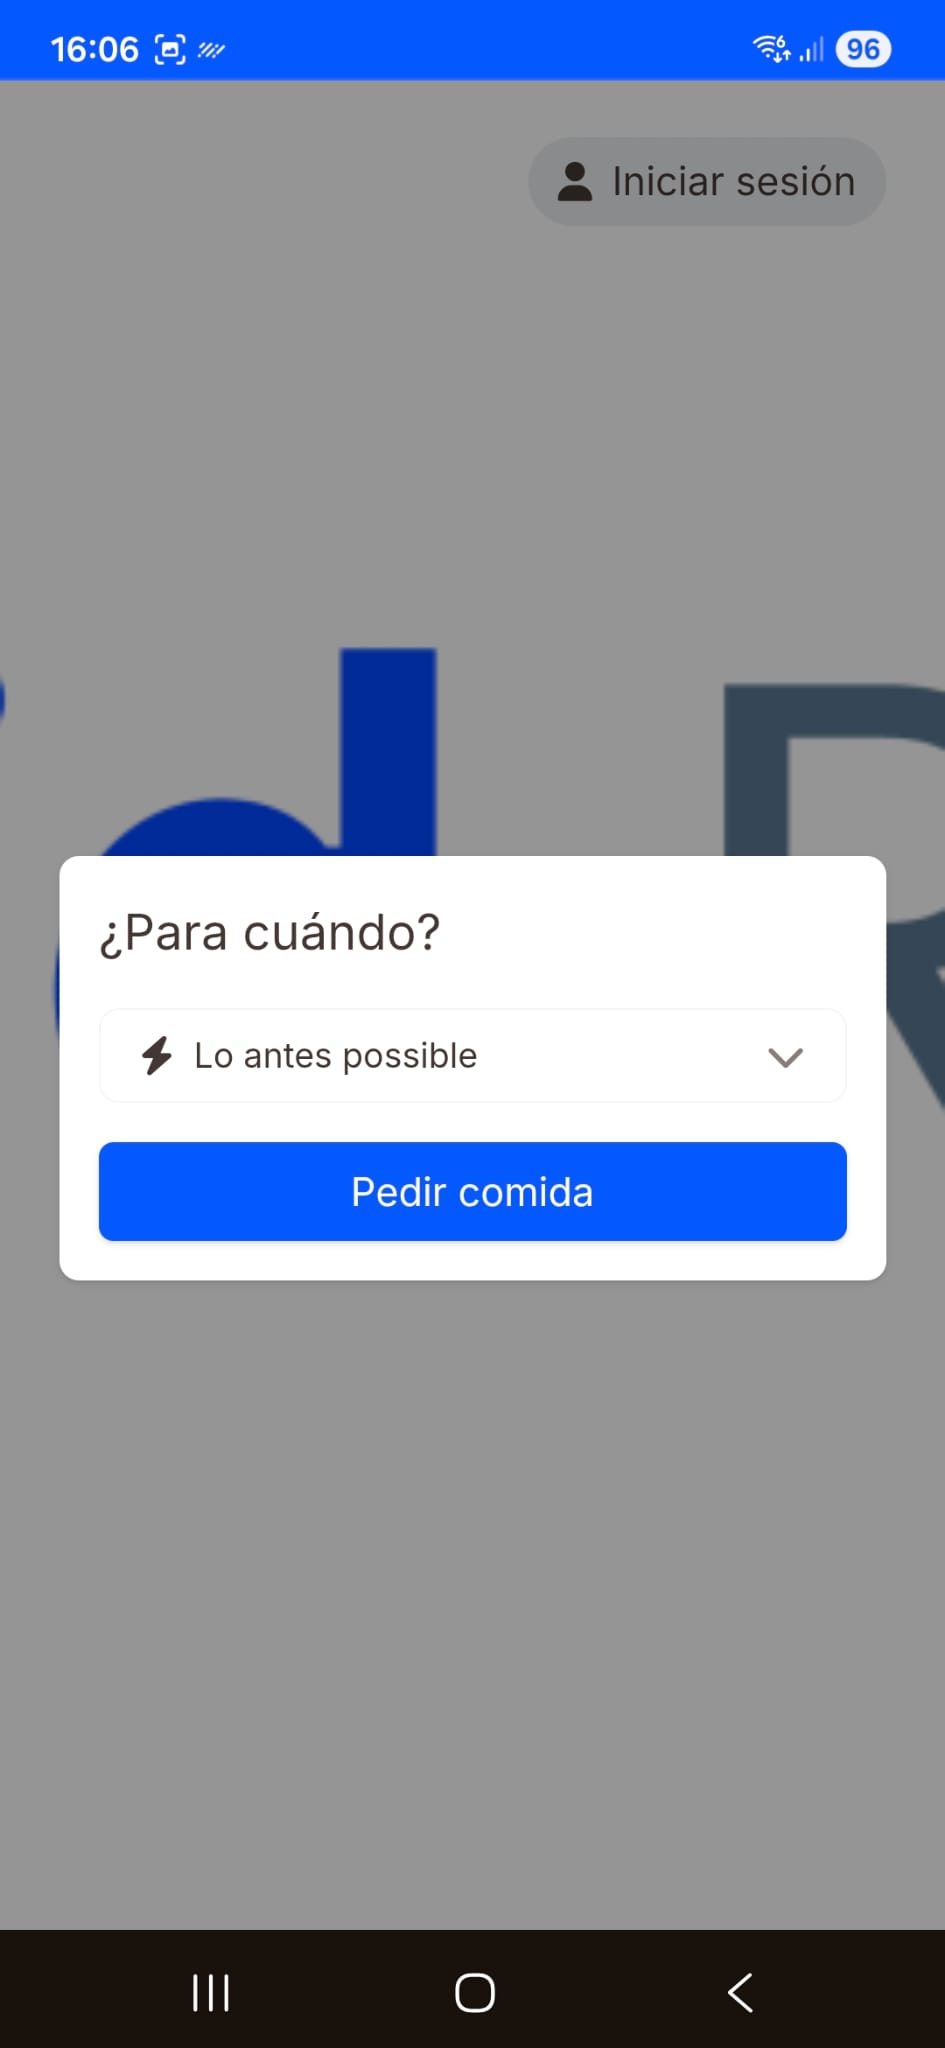
Once the application is installed and opened, the customer will directly access the main screen of the Revo SOLO link, from where they can check the menu, place orders, or navigate through the different available options of the establishment:
2. If the customer, when accessing the link, clicks the “Don't show again” button on the installation screen, there will be no problem if they later decide they do want to install the app.
In that case, the customer can still install the application at any time. To do so, they just have to click on the three dots located in the upper right part of the screen and then select the option "Install app".
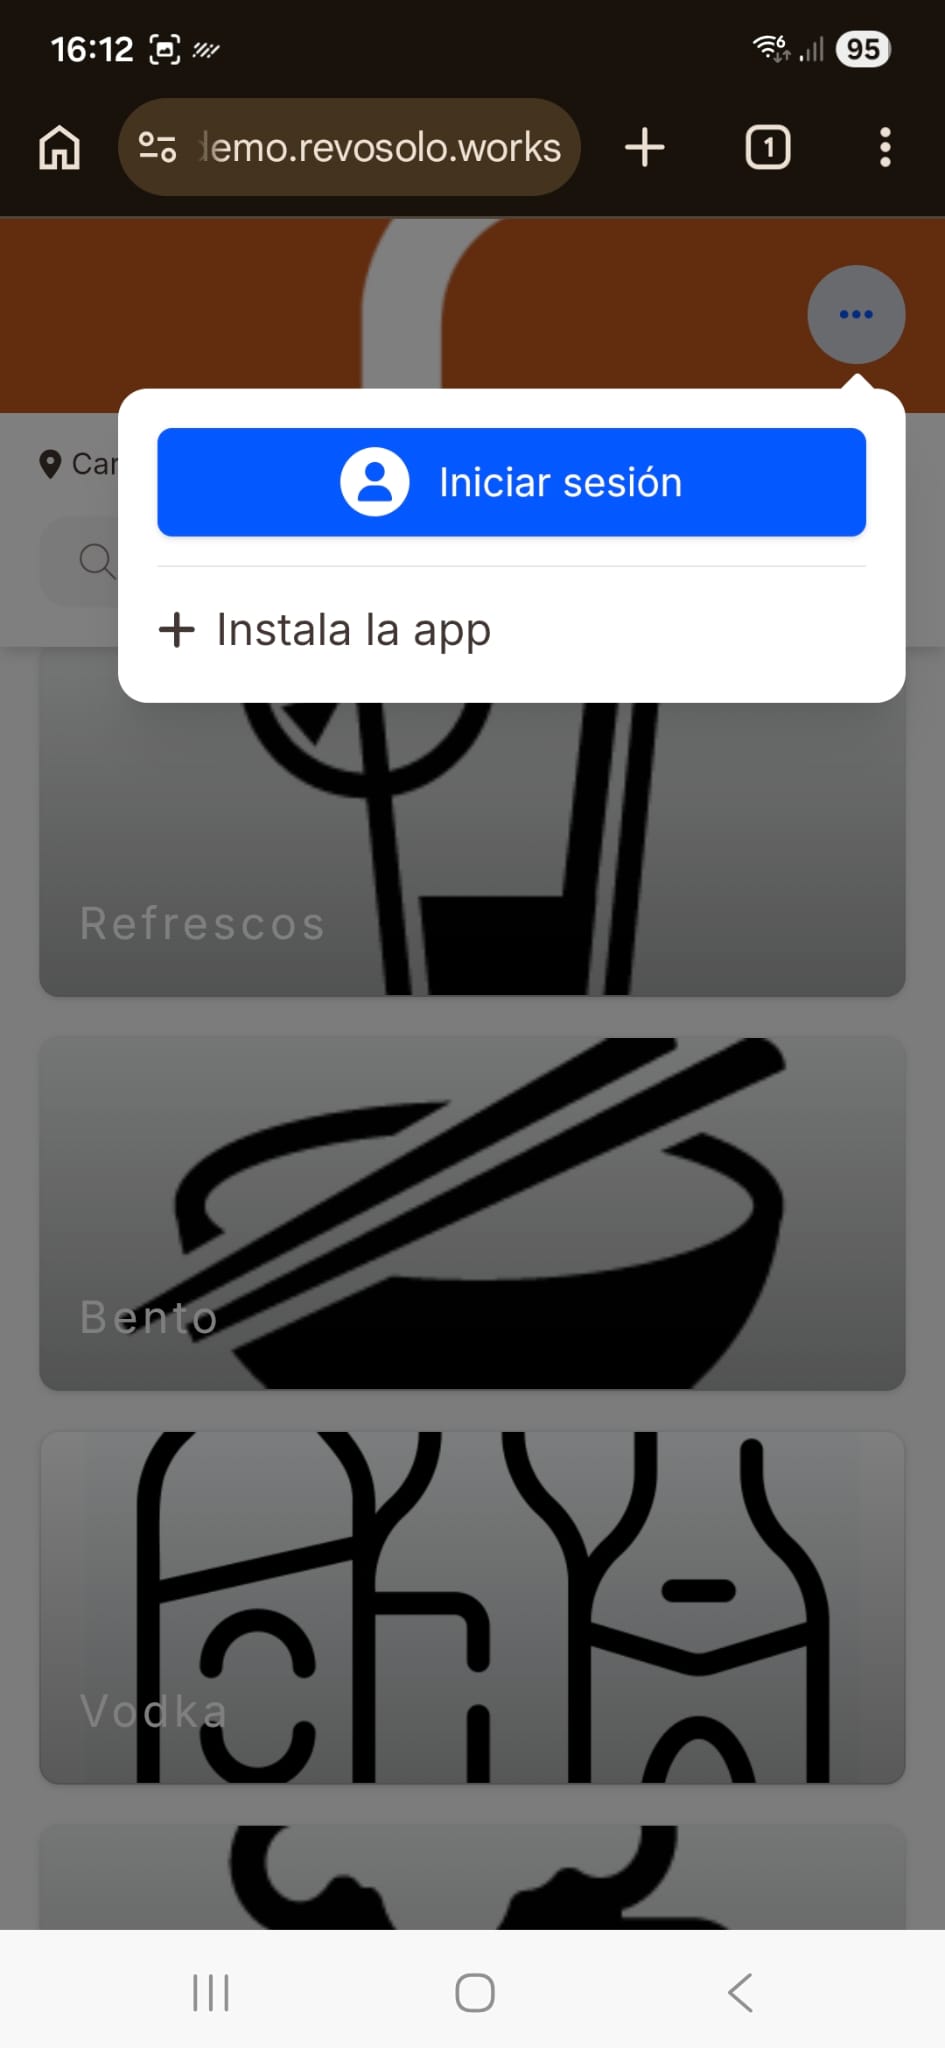
In this way, even if they initially dismissed the installation notice, they will always have the possibility to install the application manually from the browser.
App installed and opened in full screen:
PWA INSTALLATION PROCESS 2
On some mobile devices, the PWA installation process may vary slightly depending on the browser or operating system.
For example, on iPhone (iOS), the browser will show different steps than those shown previously.
Below are screenshots illustrating what this second installation process for the Revo SOLO PWA looks like and how it is performed.
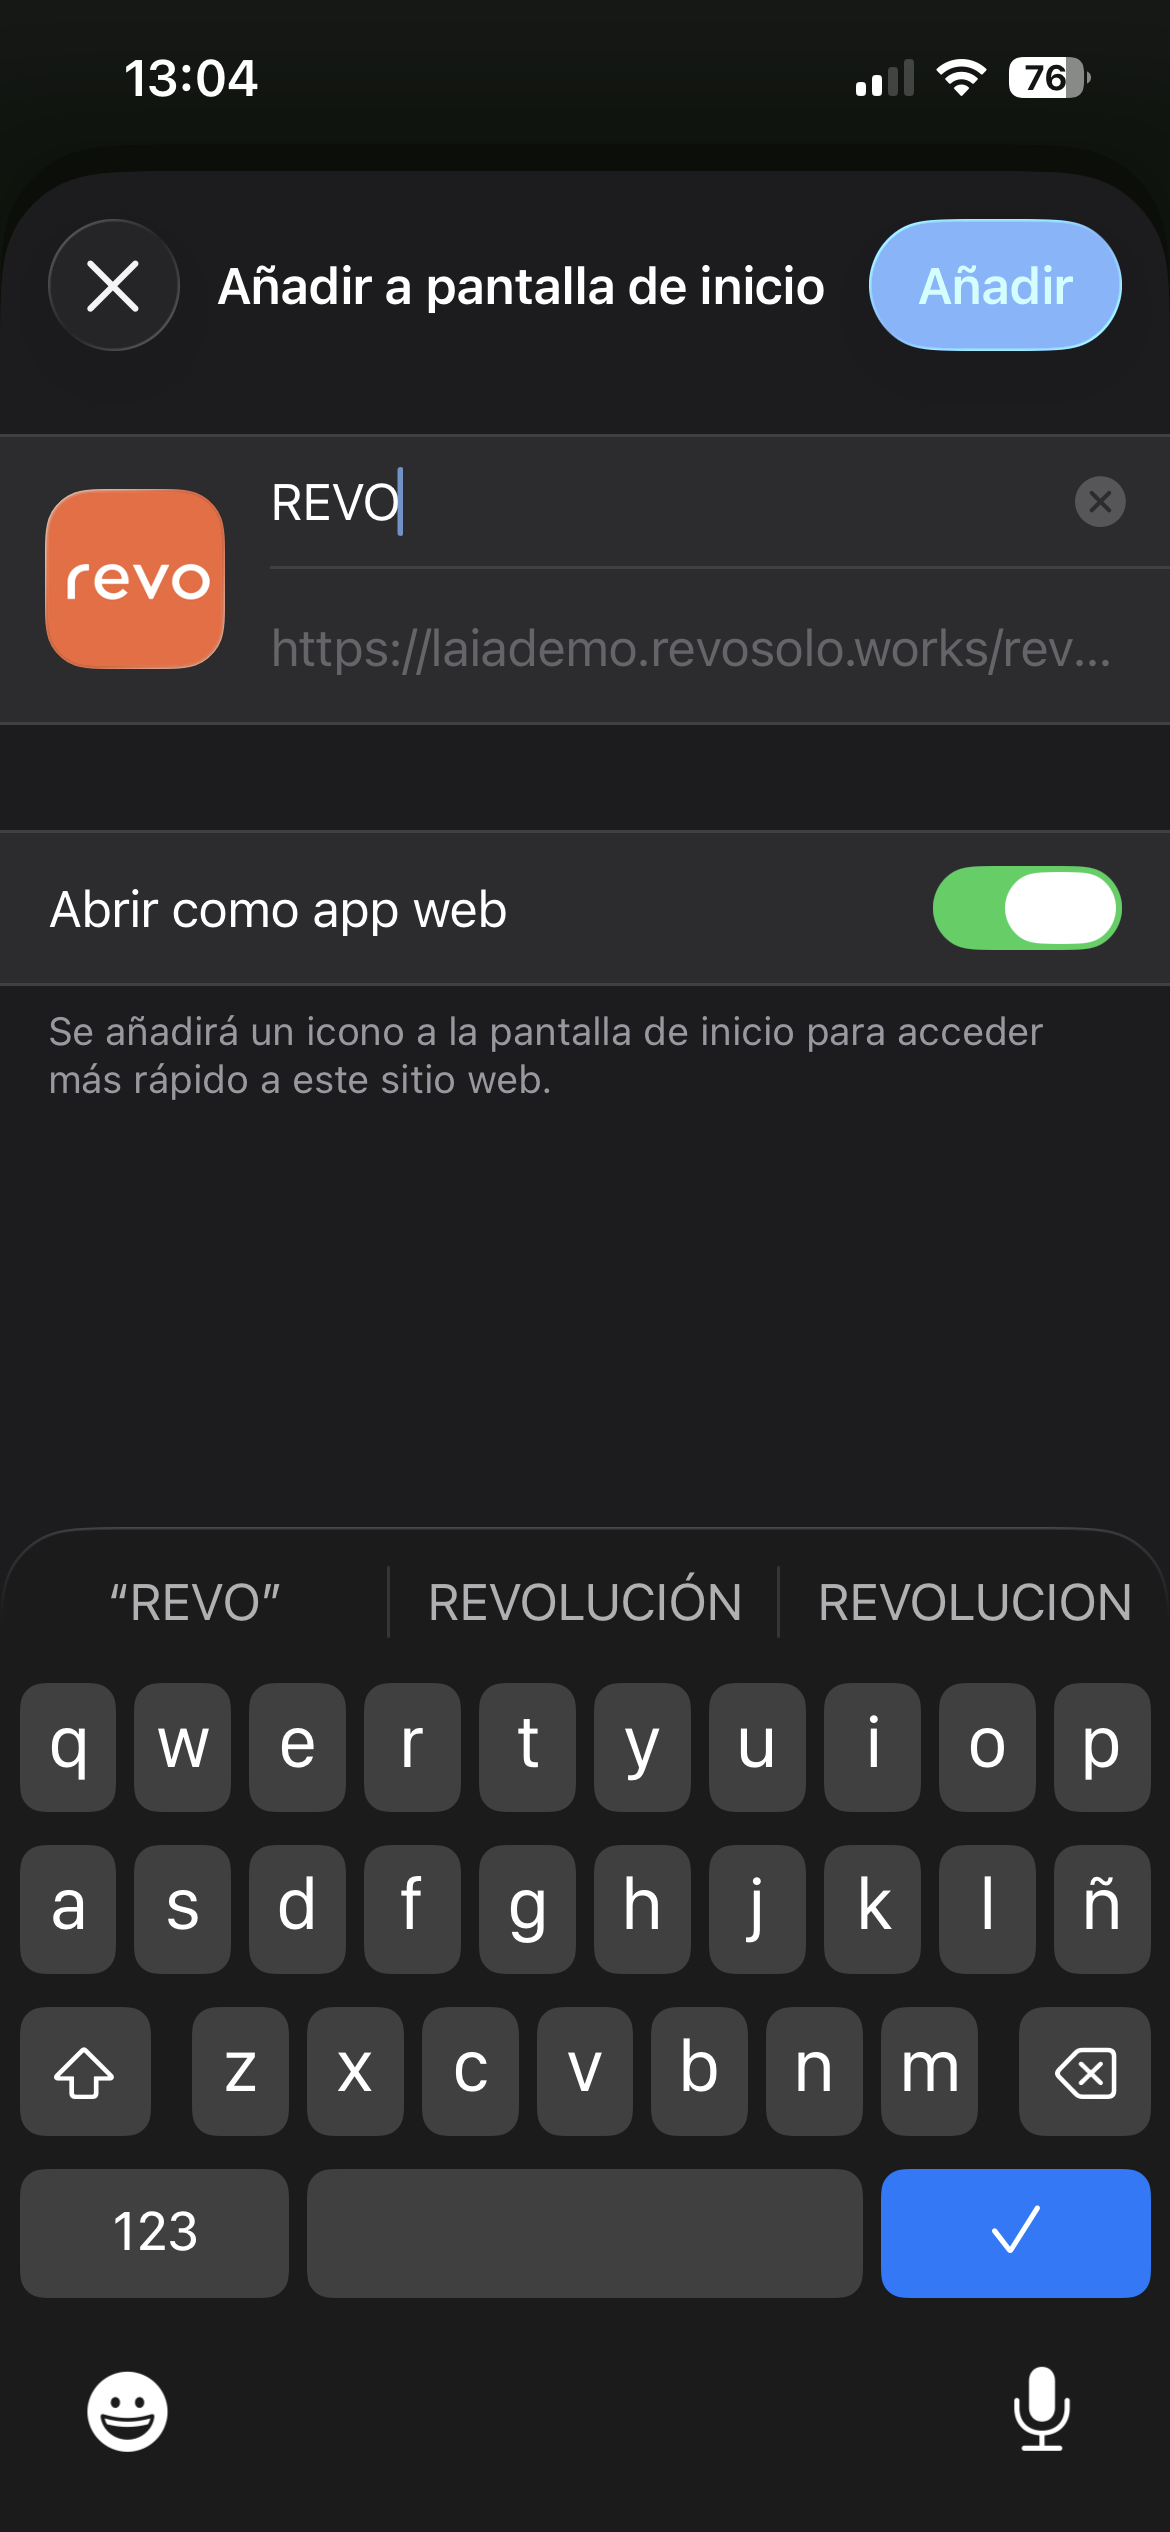
- 1. Tap the "Share" button: allows you to install the application on the mobile device.
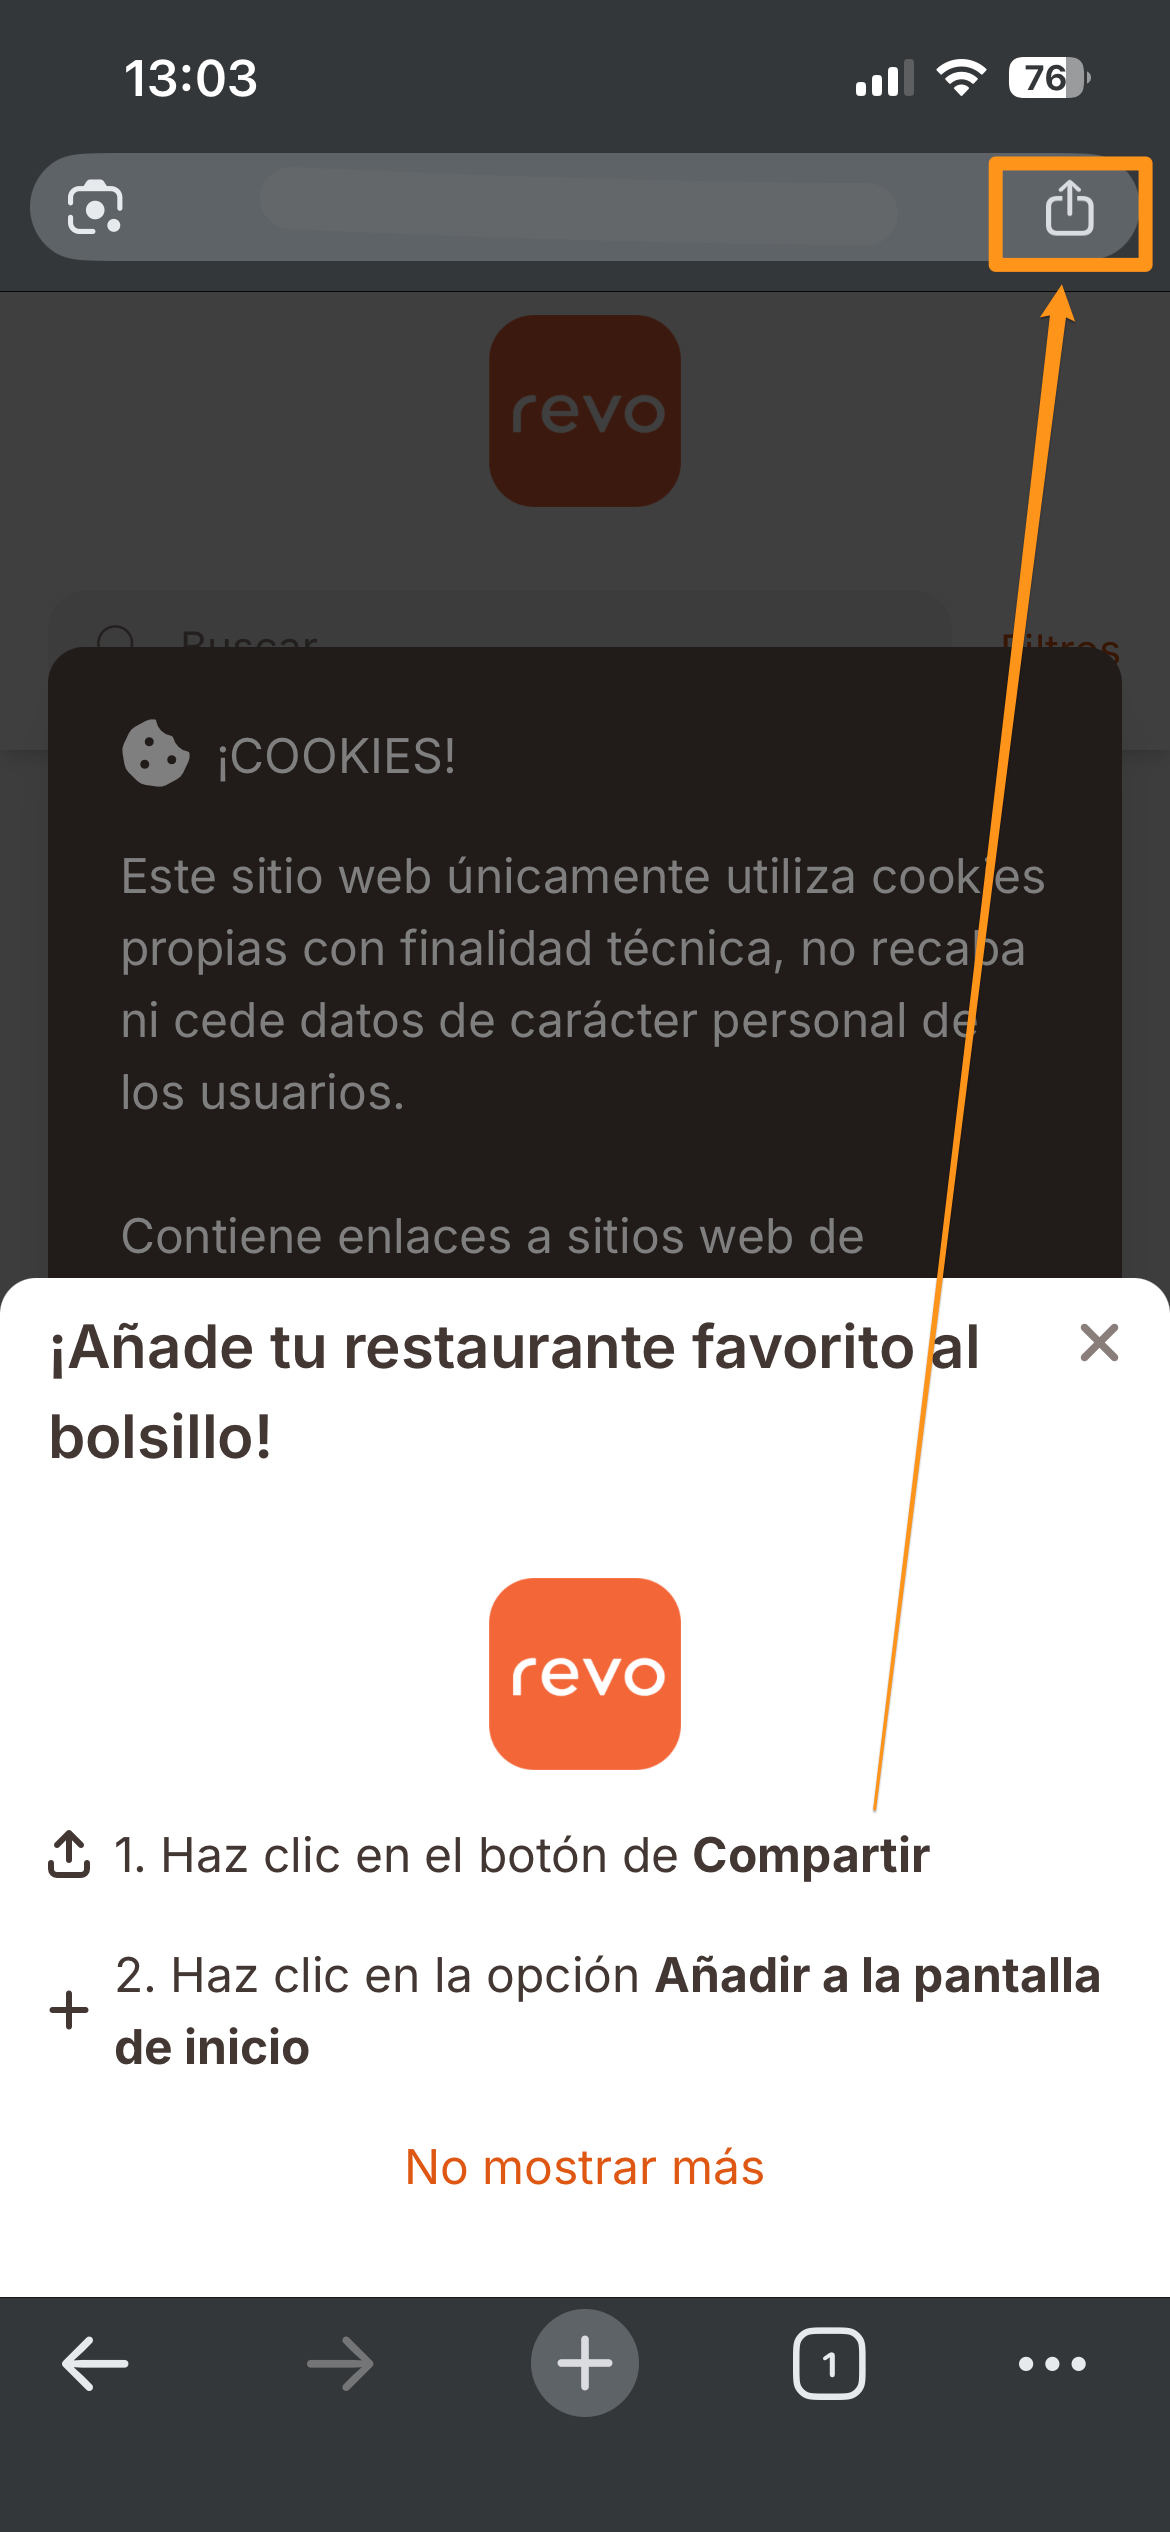
If the customer taps the "Share" button, a new window will appear and they must tap "Add to Home Screen":
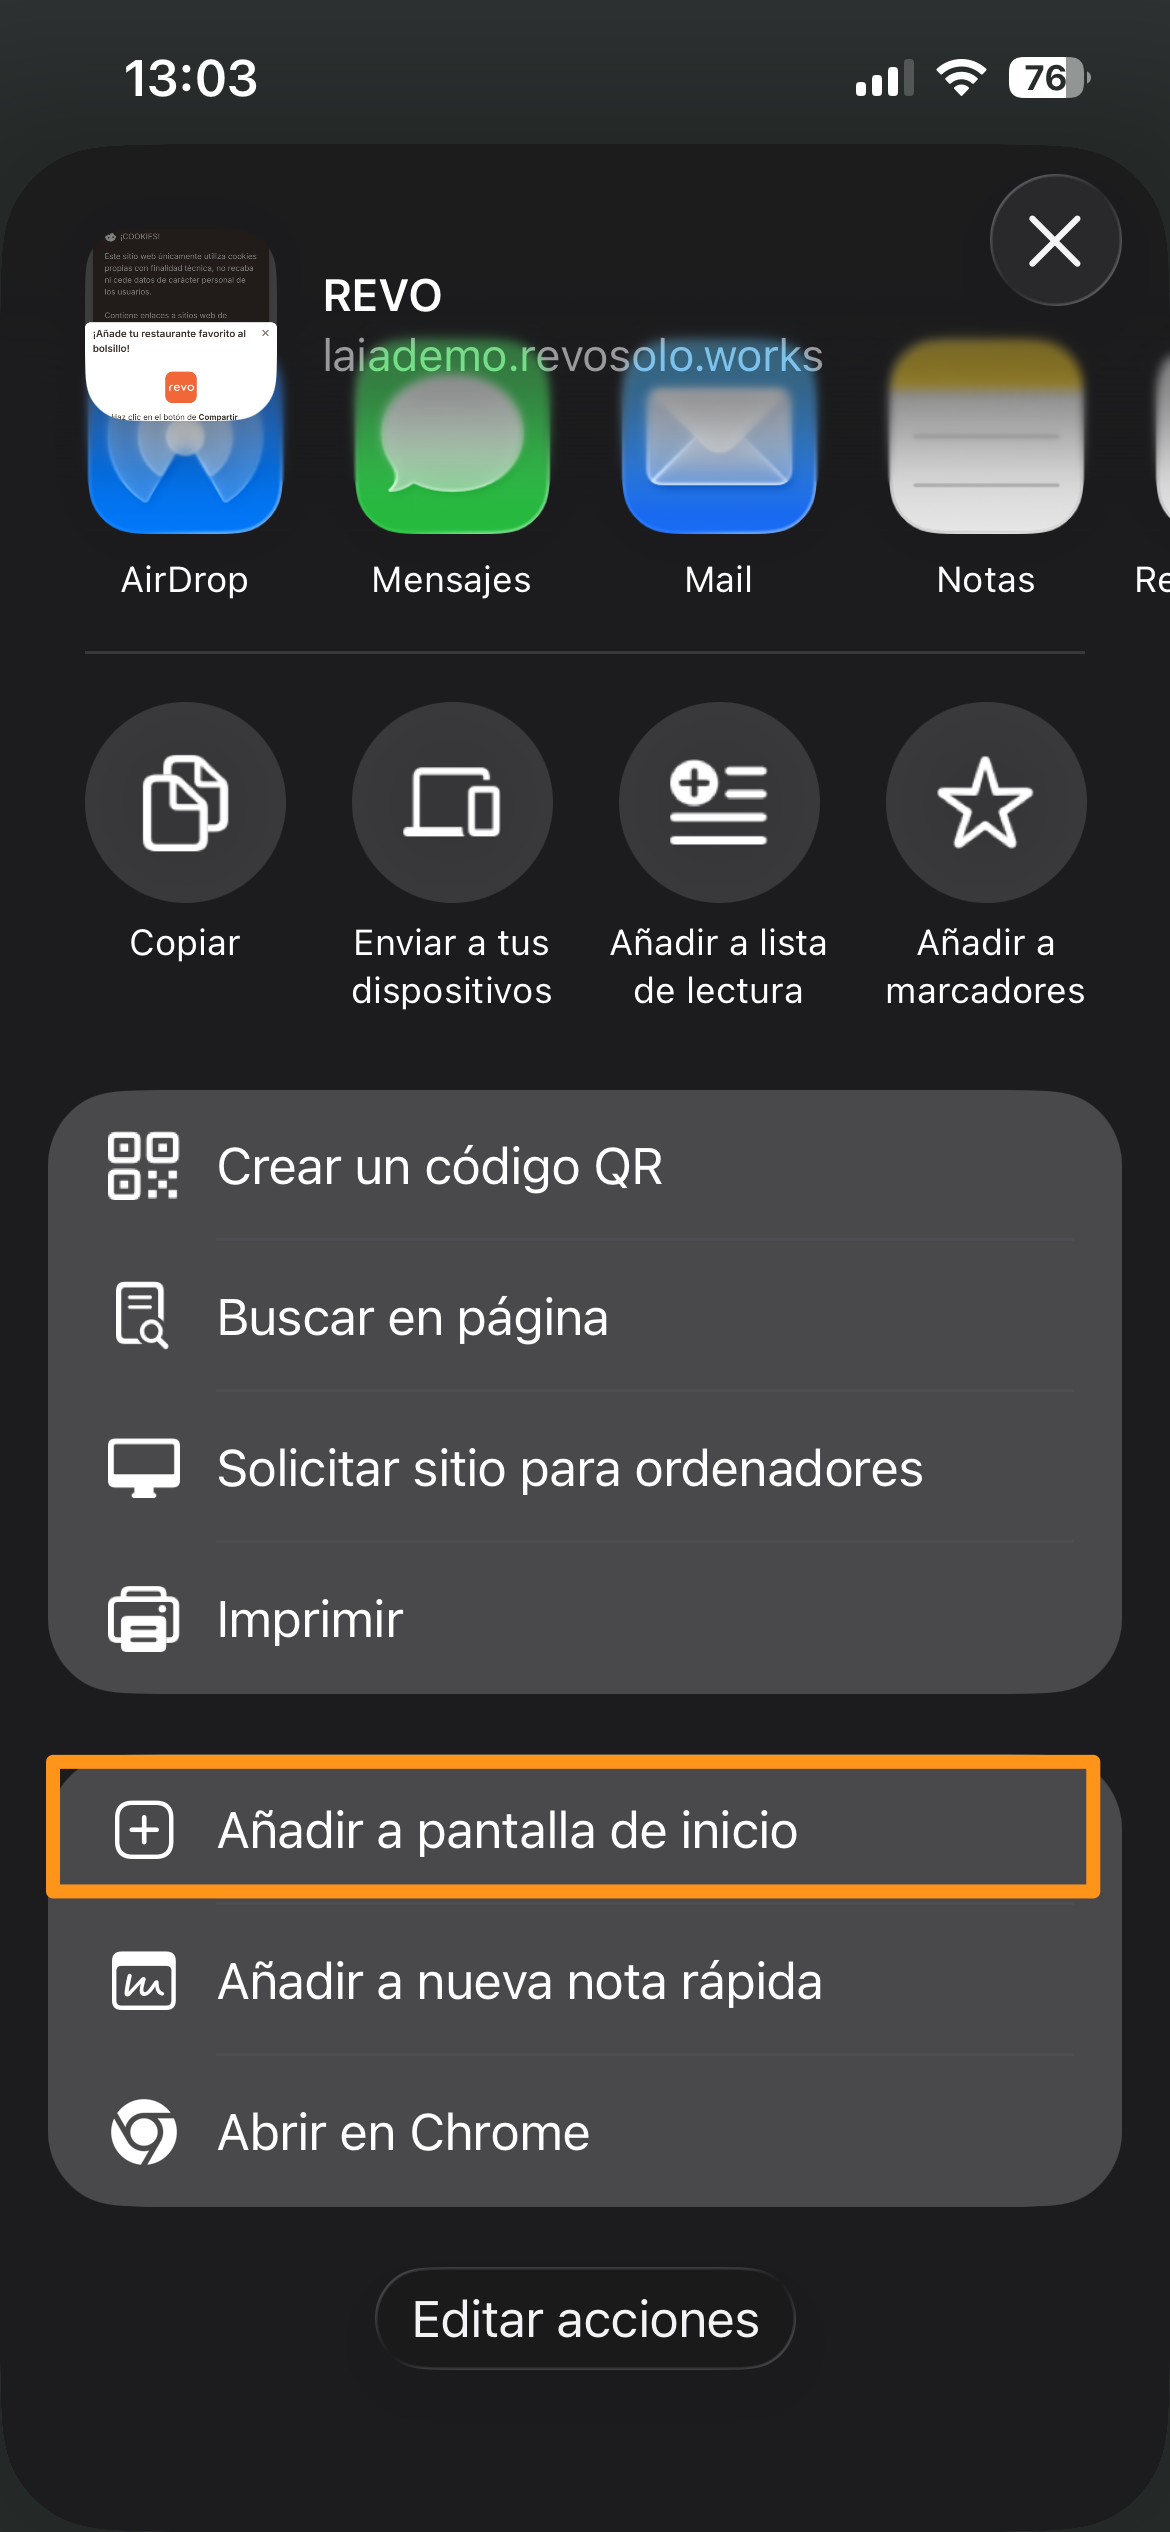
Finally, they simply need to tap the "Add" button:
After completing these steps, the app will be successfully installed on the device and will be ready to use from the home screen.