
- STATUS: ACTIVE
- COMPATIBLE VERSION: 4.0
1. HOW DOES THE INTEGRATION BETWEEN REDSYS AND REVO WORK? 2. HOW TO CREATE A VIRTUAL POS 3. HOW TO TRANSFER THE VIRTUAL POS FROM TESTING TO PRODUCTION 4. CONSIDERATIONS TO KEEP IN MIND WITH THE BANK 5. REVO SOLO 5.1 HOW TO CONFIGURE THE REDSYS PAYMENT GATEWAY FOR REVO SOLO 5.2 RETURN POLICY AND PRIVACY POLICY IN REVO SOLO 6. REVO SOLO XPRESS 6.1 HOW TO CONFIGURE THE REDSYS PAYMENT GATEWAY FOR REVO XPRESS
Redsys is a virtual payment platform that allows you to charge customers using credit or debit cards. It acts as an intermediary between your customer and the bank so you receive payments quickly and easily.
1. HOW DOES THE INTEGRATION BETWEEN REDSYS AND REVO WORK?
Redsys transfers the money from the customer’s account to your bank account. Once you’ve set up Redsys and integrated it with Revo, payments will be recorded automatically.
2. HOW TO CREATE A VIRTUAL POS TERMINAL
Contact your bank manager and request a Virtual POS Terminal with Redsys PSP. Make sure they add the following URLs in the Permitted inSite Domains field so the gateway works properly.
These URLs must be entered exactly as shown here:
- https://{tenant}.revosolo.works
- https://xpress.revo.works
- https://revoflow.works
IMPORTANT: These URLs will soon be deactivated:
- https://solo.revointouch.works
- https://revointouch.works
- https://{tenant}.solo.revointouch.works
- https://{tenant}.revointouch.works
- https://revoxpress.works
IMPORTANT:
- The back-office login URL for Revo SOLO is: https://revosolo.works
-
Request the inSite URL based on how you create your QR codes in Revo SOLO. This URL depends on the domain you use to access the back-office.
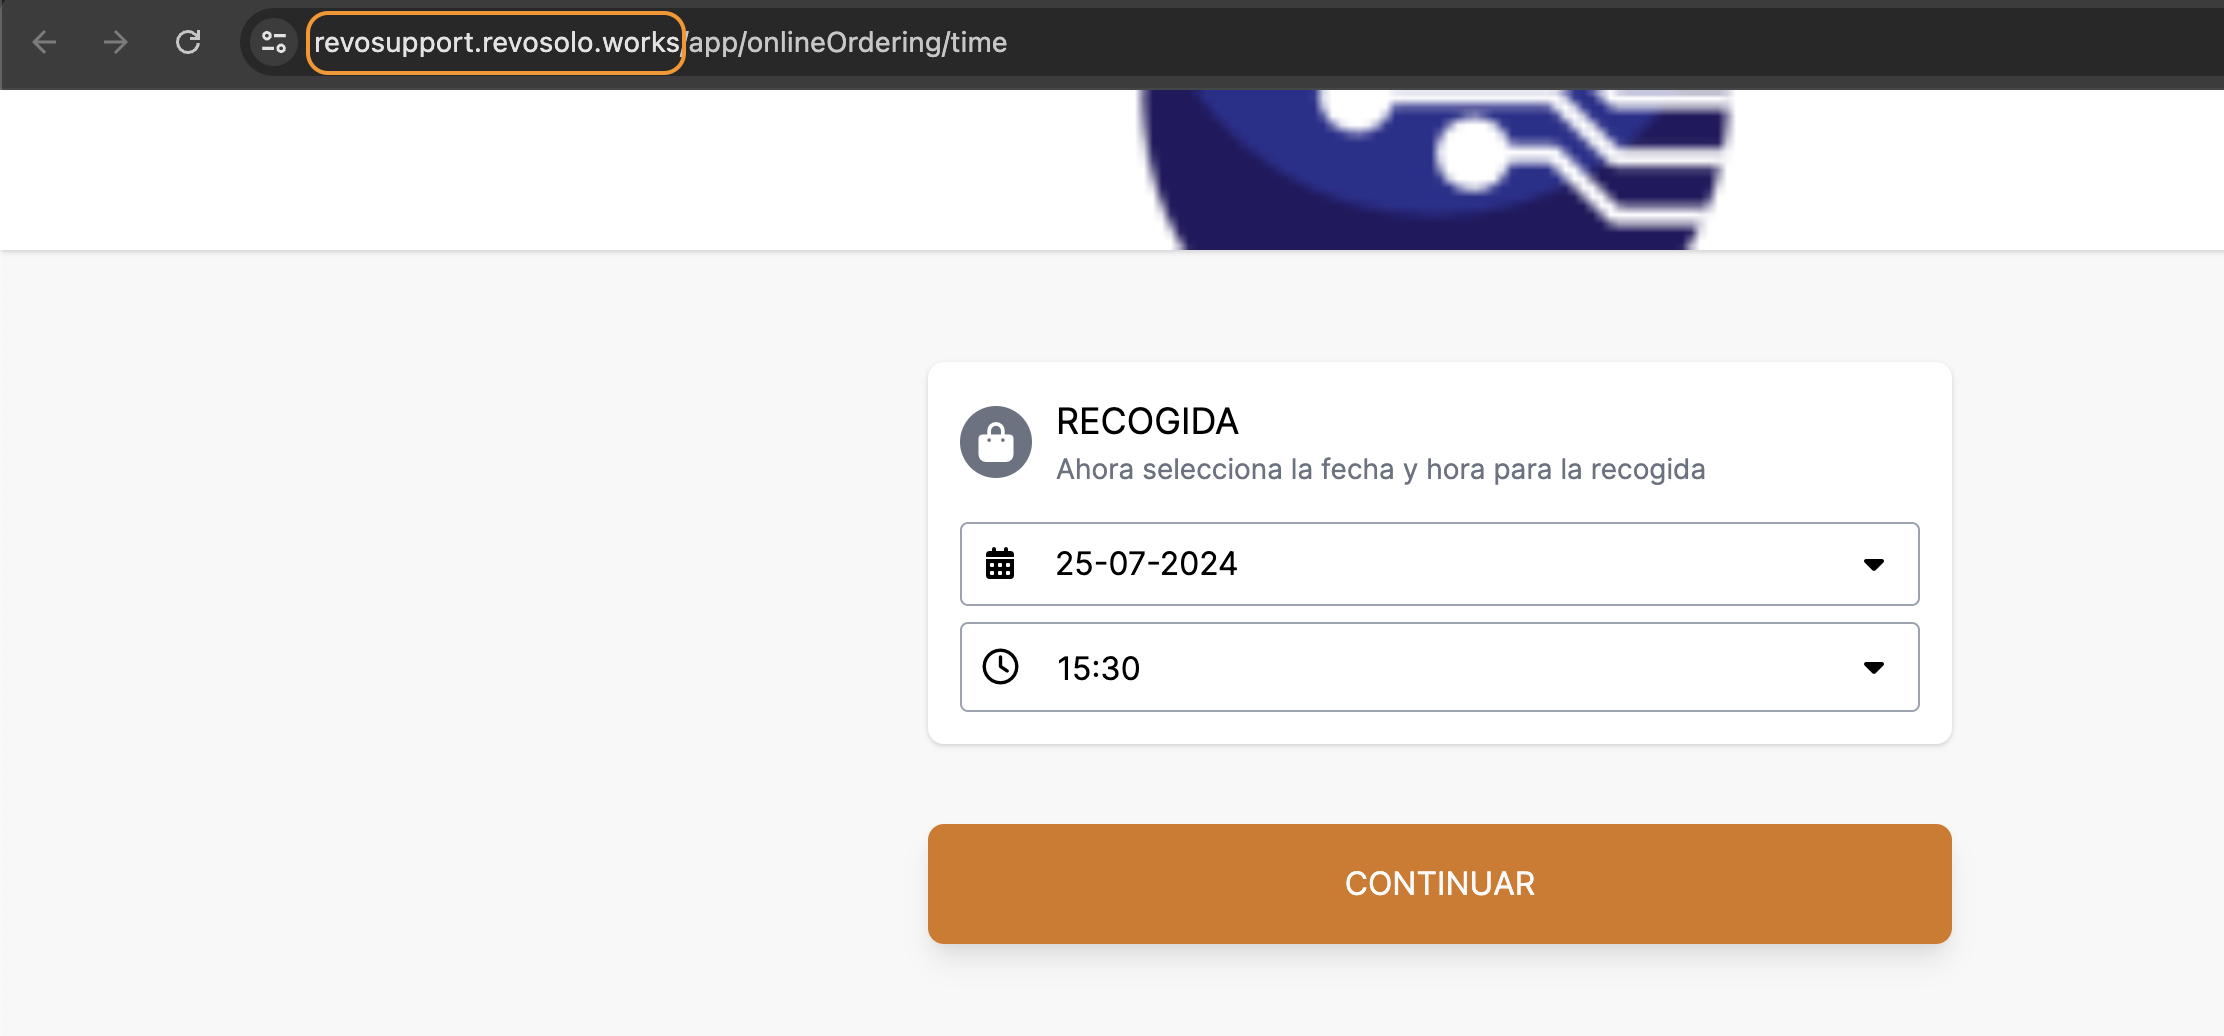
In the image, the tenant (account name) is revosupport.
-
If your bank does not allow multiple URLs, you’ll need to request a separate Virtual POS Terminal for each REVO app you use – for example, Revo SOLO and Revo XPRESS.
-
If your bank asks you to provide the main URL, it will be https://{tenant}.revosolo.works.
-
If you already had QR codes on tables, the old URLs will continue to work. This only affects new accounts and newly created orders.
-
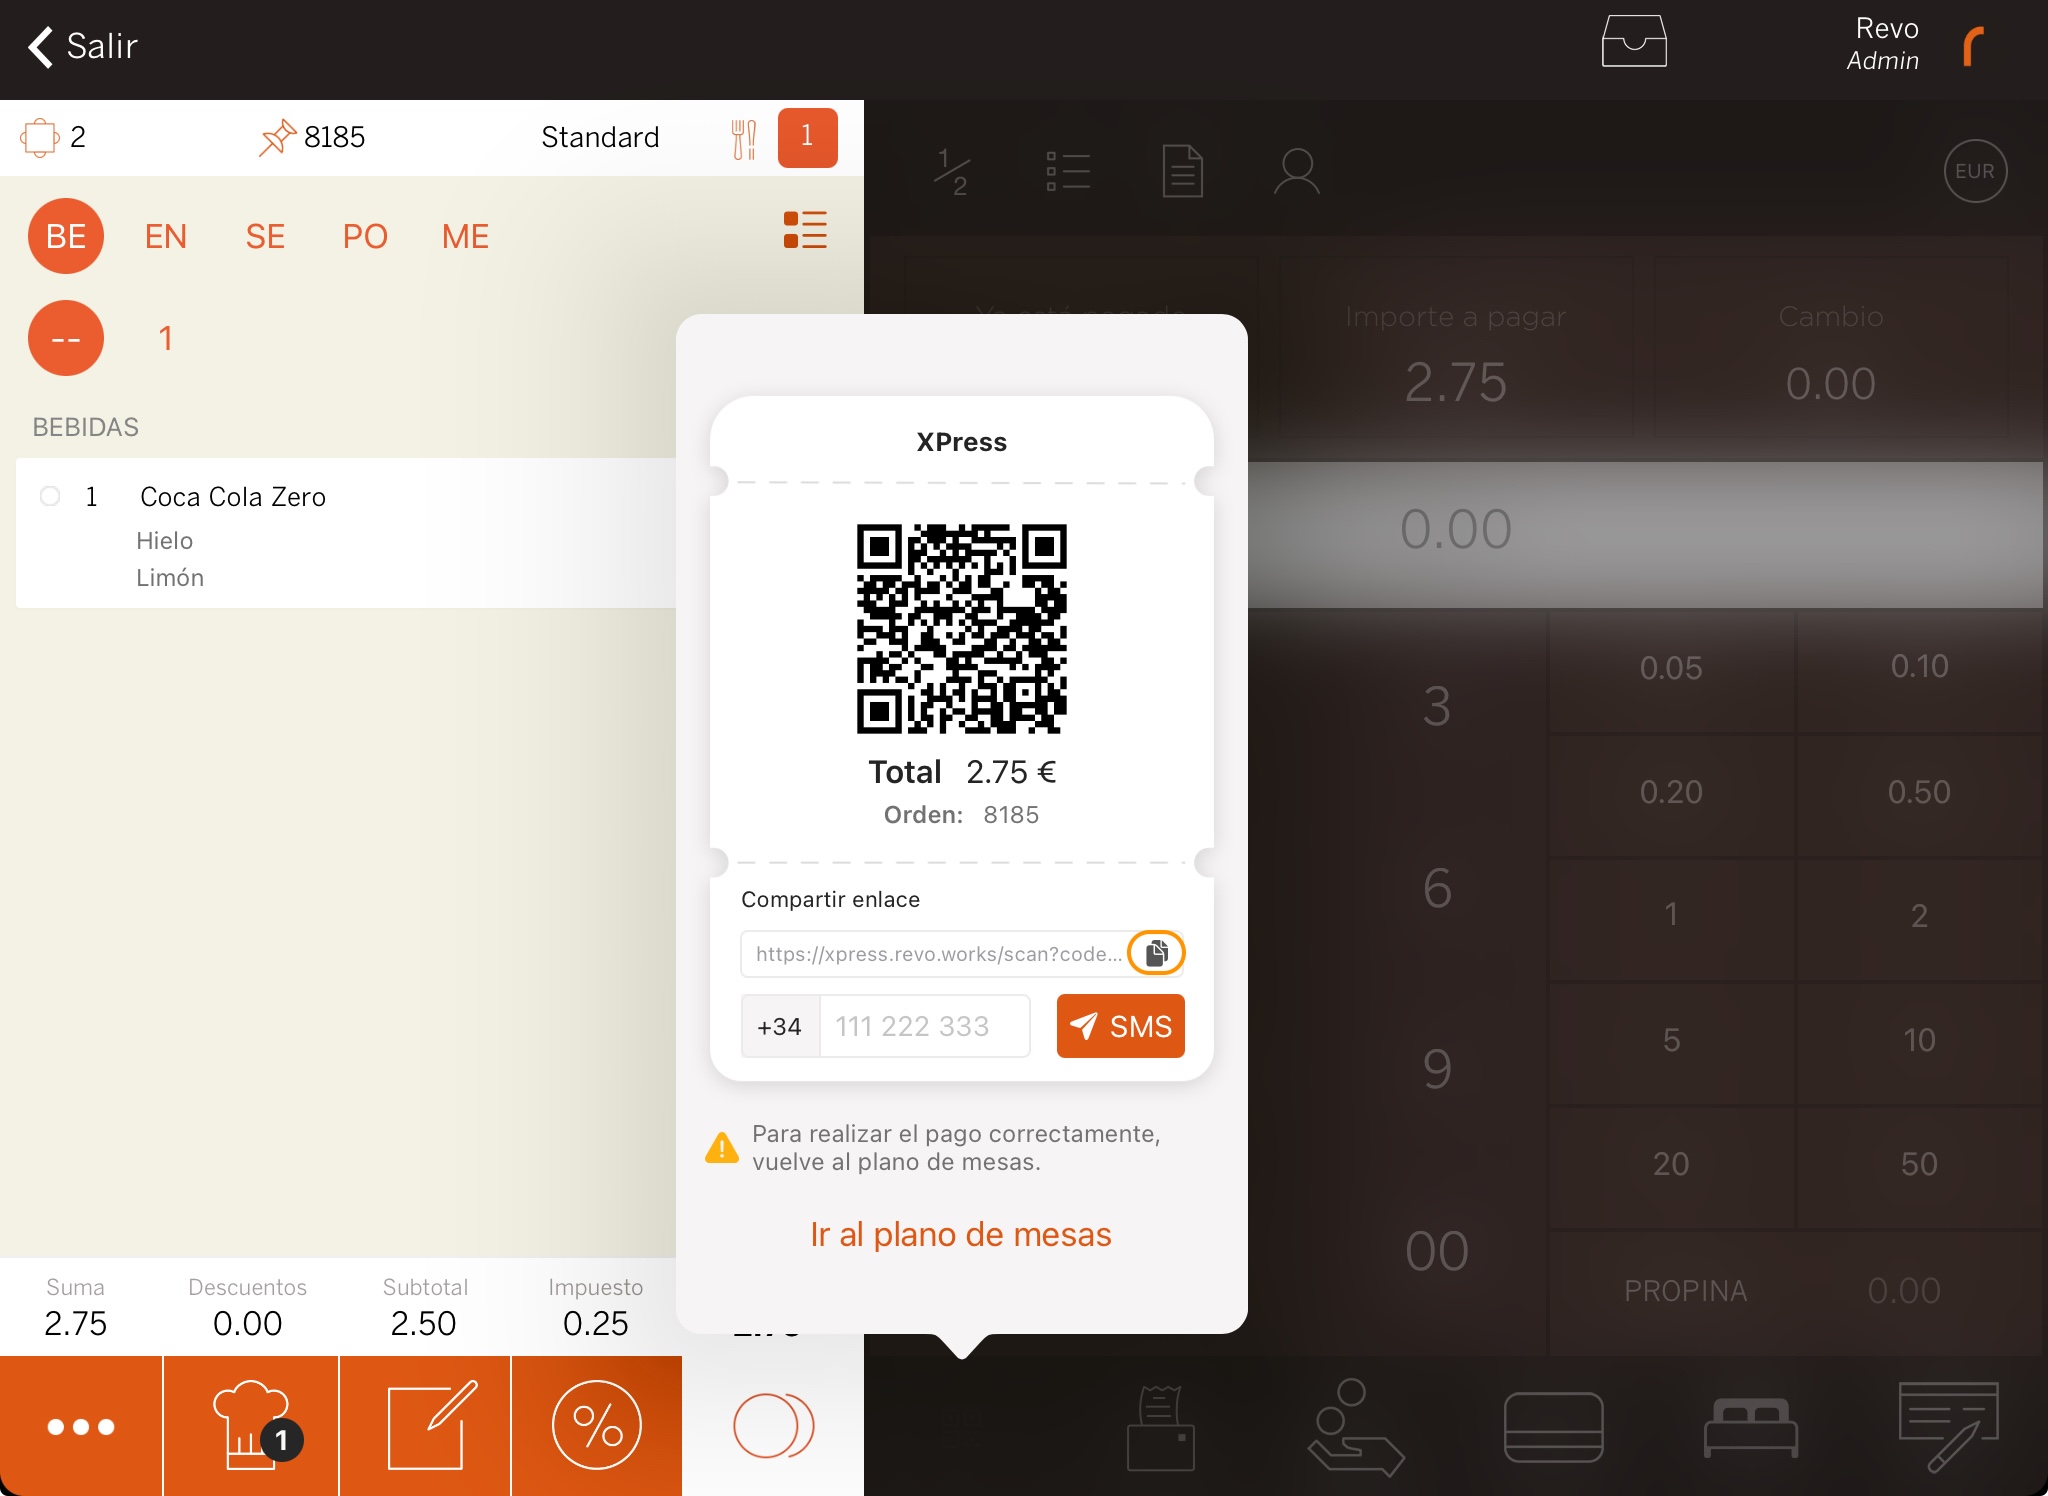
We recommend that when requesting the POS Terminal from the bank, you include a QR link from XPRESS so they can verify it. To do this:
-
Open a virtual table in Revo XEF (keep it open until they check it).
-
Add a product and copy the XPRESS link.
-
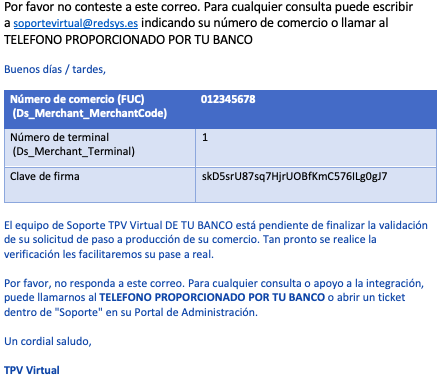
Once your Virtual POS Terminal has been created, you will receive a welcome email from soportevirtual@redsys.es with instructions.

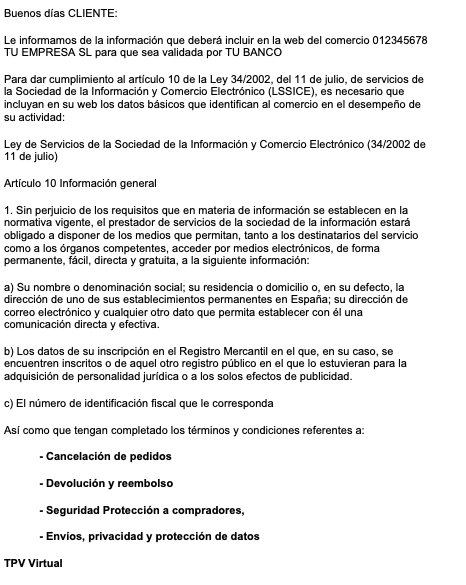
On the same day or the next, your bank will send you a letter similar to this one. You will need to prepare two policies:
- Return policy: Cancellations, refunds, reimbursements
- Privacy policy: Security, shipping, data protection
You must upload these policies to the Revo SOLO back-office (we’ll explain how later).
Then, go to the website your bank provides, log in with your credentials, and follow these steps:
1. Go to Administration > Merchant
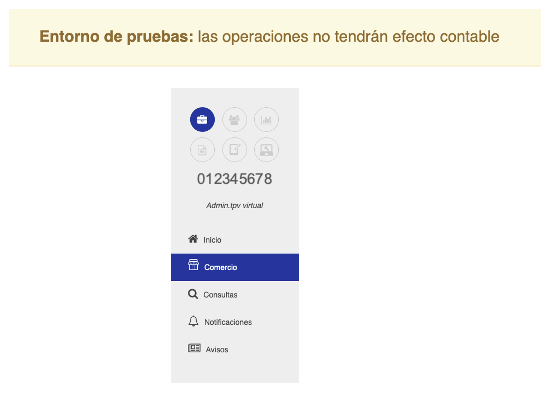
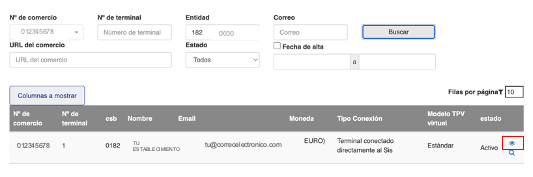
2. You’ll see a screen like this:
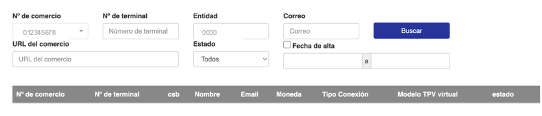
3. Click “Search” to see your merchant locations.

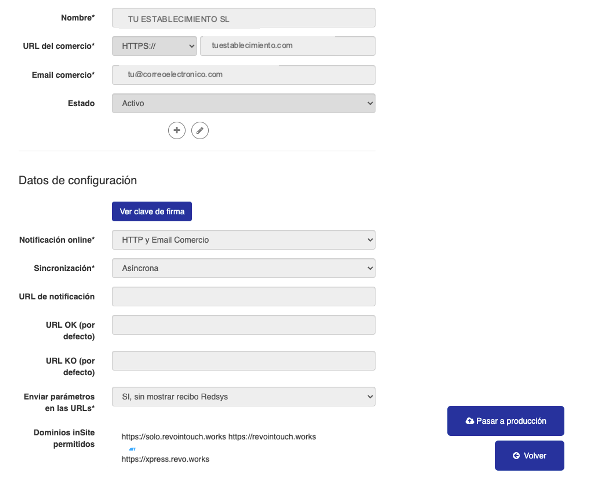
4. Click the icon to view the Virtual POS Terminal.
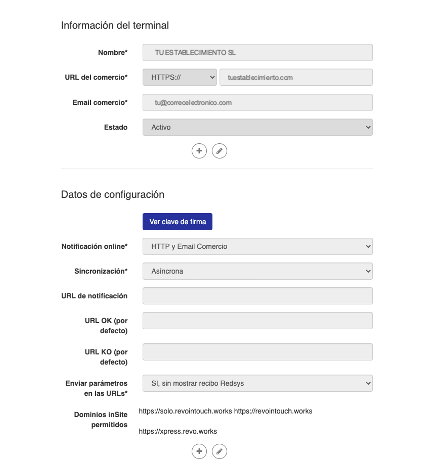
5. Ensure that the Permitted inSite Domains field includes the correct URLs. Under Send parameters in the URLs, select YES, without showing Redsys receipt.
6. Check everything is correct and save:
- The merchant management number
- The terminal number
- The signature key (click View signature key to get it)
3. HOW TO SWITCH THE VIRTUAL POS TERMINAL FROM TEST TO PRODUCTION
Once you’ve tested payments and everything works correctly, you can request the Virtual POS Terminal to be activated in production mode.
Log in to the test environment of the Virtual POS Terminal with your credentials and follow these steps:
1. Go to Administration > Merchant
2. Click “Search” to see your merchant locations:
3. Click the icon and then select “Switch to production”.
4. You’ll receive an email from canales@redsys.es with keys that the platform will request in order to switch to production.
5. Once your website is validated, you’ll receive another email with instructions to configure your Virtual POS Terminal in the live environment. Follow them step by step.
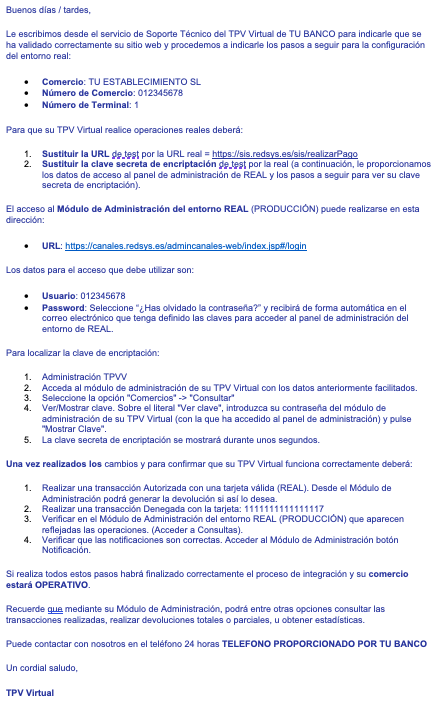
6. Just like in the test environment, make sure that:
- The Permitted inSite Domains field contains the correct URLs
- Under Send parameters in the URLs, select YES, without showing Redsys receipt
7. When everything is correct, save:
- The merchant management number
- The terminal number
- The signature key (click View signature key to obtain it)
IMPORTANT: Check whether this signature key matches the one already configured in Revo SOLO. If it does not, replace it with the new one.
4. CONSIDERATIONS TO TAKE INTO ACCOUNT WITH THE BANK
4.1. Modify security policy
Depending on your type of business, you might need to ask your bank to adjust the following limits:
- Max. transactions per card per day: from 3 (standard) to 15
- Max. transactions per IP per day: from 3 to 15
- Max. amount per card per day: from €1,000 to €1,500
- Max. amount per IP per day: from €1,000 to €1,500
- Card from outside Spain or IP from outside Spain: ALLOW / DO NOT ALLOW
4.2. Food delivery or local pickup businesses
As the customer pays directly, their IP is counted as the origin. If a customer makes more than 3 payments per day, bear the above limits in mind.
If you share your Wi-Fi with customers, the IP will be the same, and it will affect the number of operations. Talk to your bank if this applies to you.
4.3. International cards
Ask your bank to allow payments using foreign cards.
4.4. Card registration for future payments
The bank must allow cards to be saved in the terminal app. Otherwise, errors might occur.
Make sure card-not-present payments are enabled in your merchant profile. Ask your account manager to activate it.
If you cannot save the card, request the bank to enable the Tokenisation Operation option.
4.5. Apple Pay / Google Pay
If you want your customers to be able to pay with Apple Pay or Google Pay, ask your bank to enable them in the gateway.
They’ll need the following information:
- Apple Pay Merchant ID: merchant.com.redsys.revointouch
- Apple Pay Private Key: attached certificate
- The private key is in the file ecckey_pkcs8.key.
- According to the Redsys Manual (page 6, point 2), the contents of the file must be copied along with the merchantId in the Virtual POS portal.
- The business name in transactions will be Revo Business.
If your bank does not support it, you can disable Apple Pay and Google Pay from the back office.
Once they are enabled by the bank, open a case with Technical Support and send your business URL to activate the certificates. Example URL: revosupport.revosolo.works
5. REVO SOLO
5.1 HOW TO SET UP THE REDSYS PAYMENT GATEWAY IN REVO SOLO
Make sure Revo SOLO is properly configured.
1. Log into the back office of Revo SOLO.
2. Go to Settings / PAYMENT GATEWAYS.
3. Click on + New.
4. Fill in the following fields:
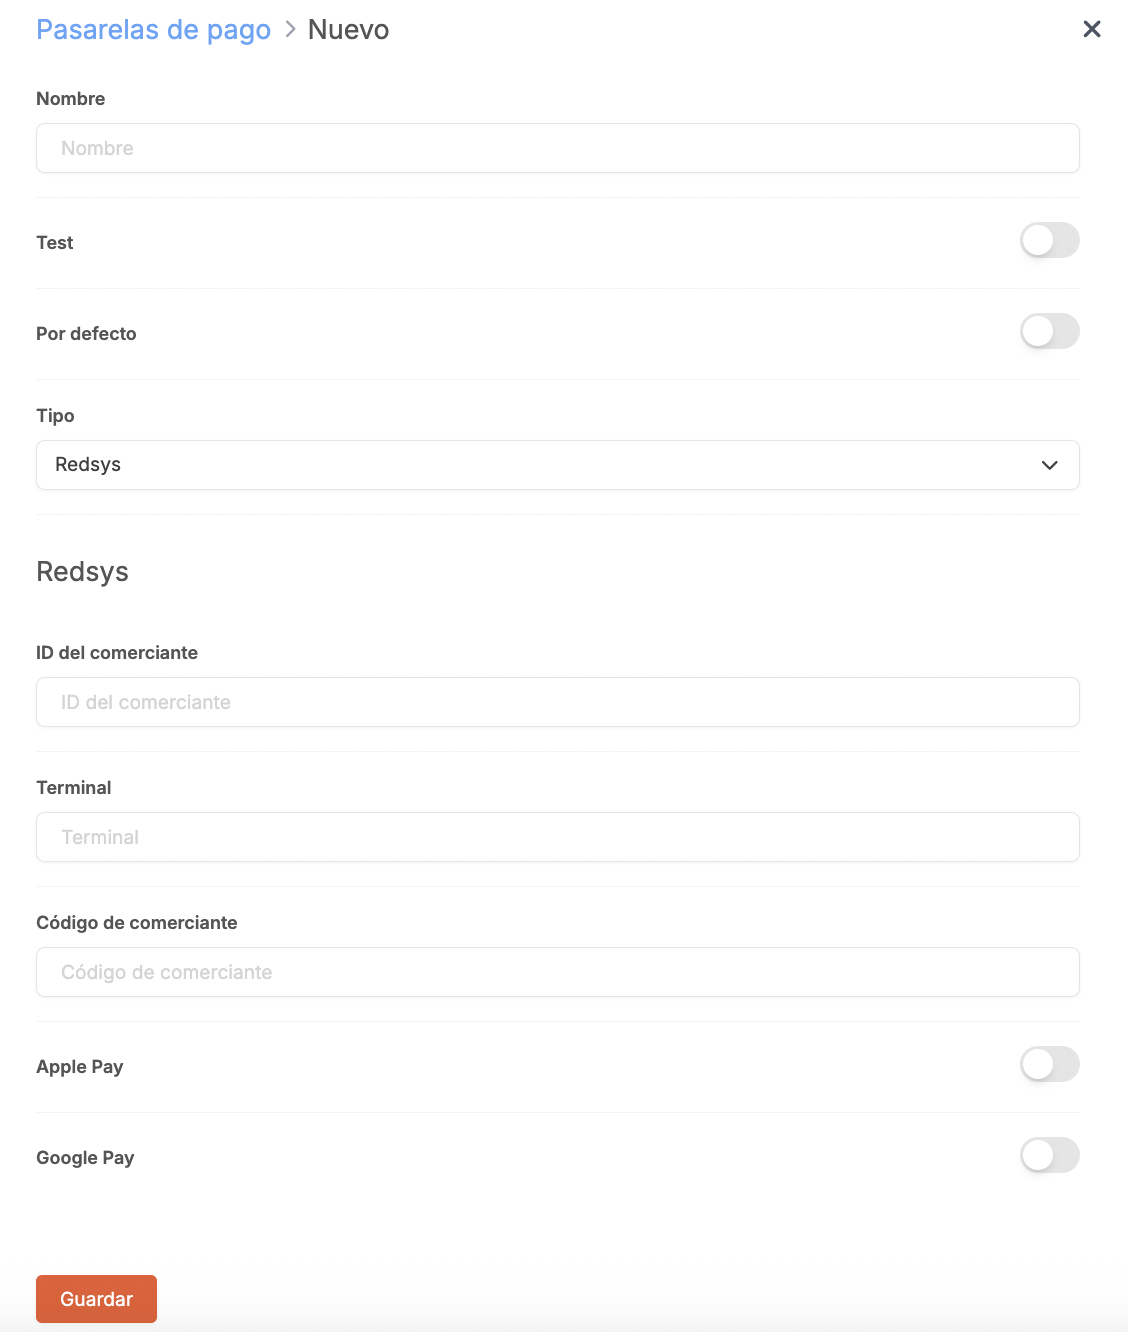
- Name: Enter a name to identify the gateway.
- Test: Enable it if you're running tests. Disable it when moving to production.
- Default: Leave it enabled.
- Type: Select Redsys.
- Merchant ID: Enter your merchant number.
- Terminal: Enter your terminal number.
- Merchant Code: Add your signature key.
- Apple Pay: Enable it if you've already provided the details from section 4.5 to the bank and Technical Support has activated the certificates.
- Google Pay: Enable it just like Apple Pay.
5. Click Save.
Once everything is saved, you'll need to assign the gateway to your establishment. Learn how to do it here.
5.2 REFUND POLICY AND PRIVACY POLICY IN REVO SOLO
1. Access the back office of Revo SOLO.
2. Go to Settings / LEGAL DOCUMENTS.
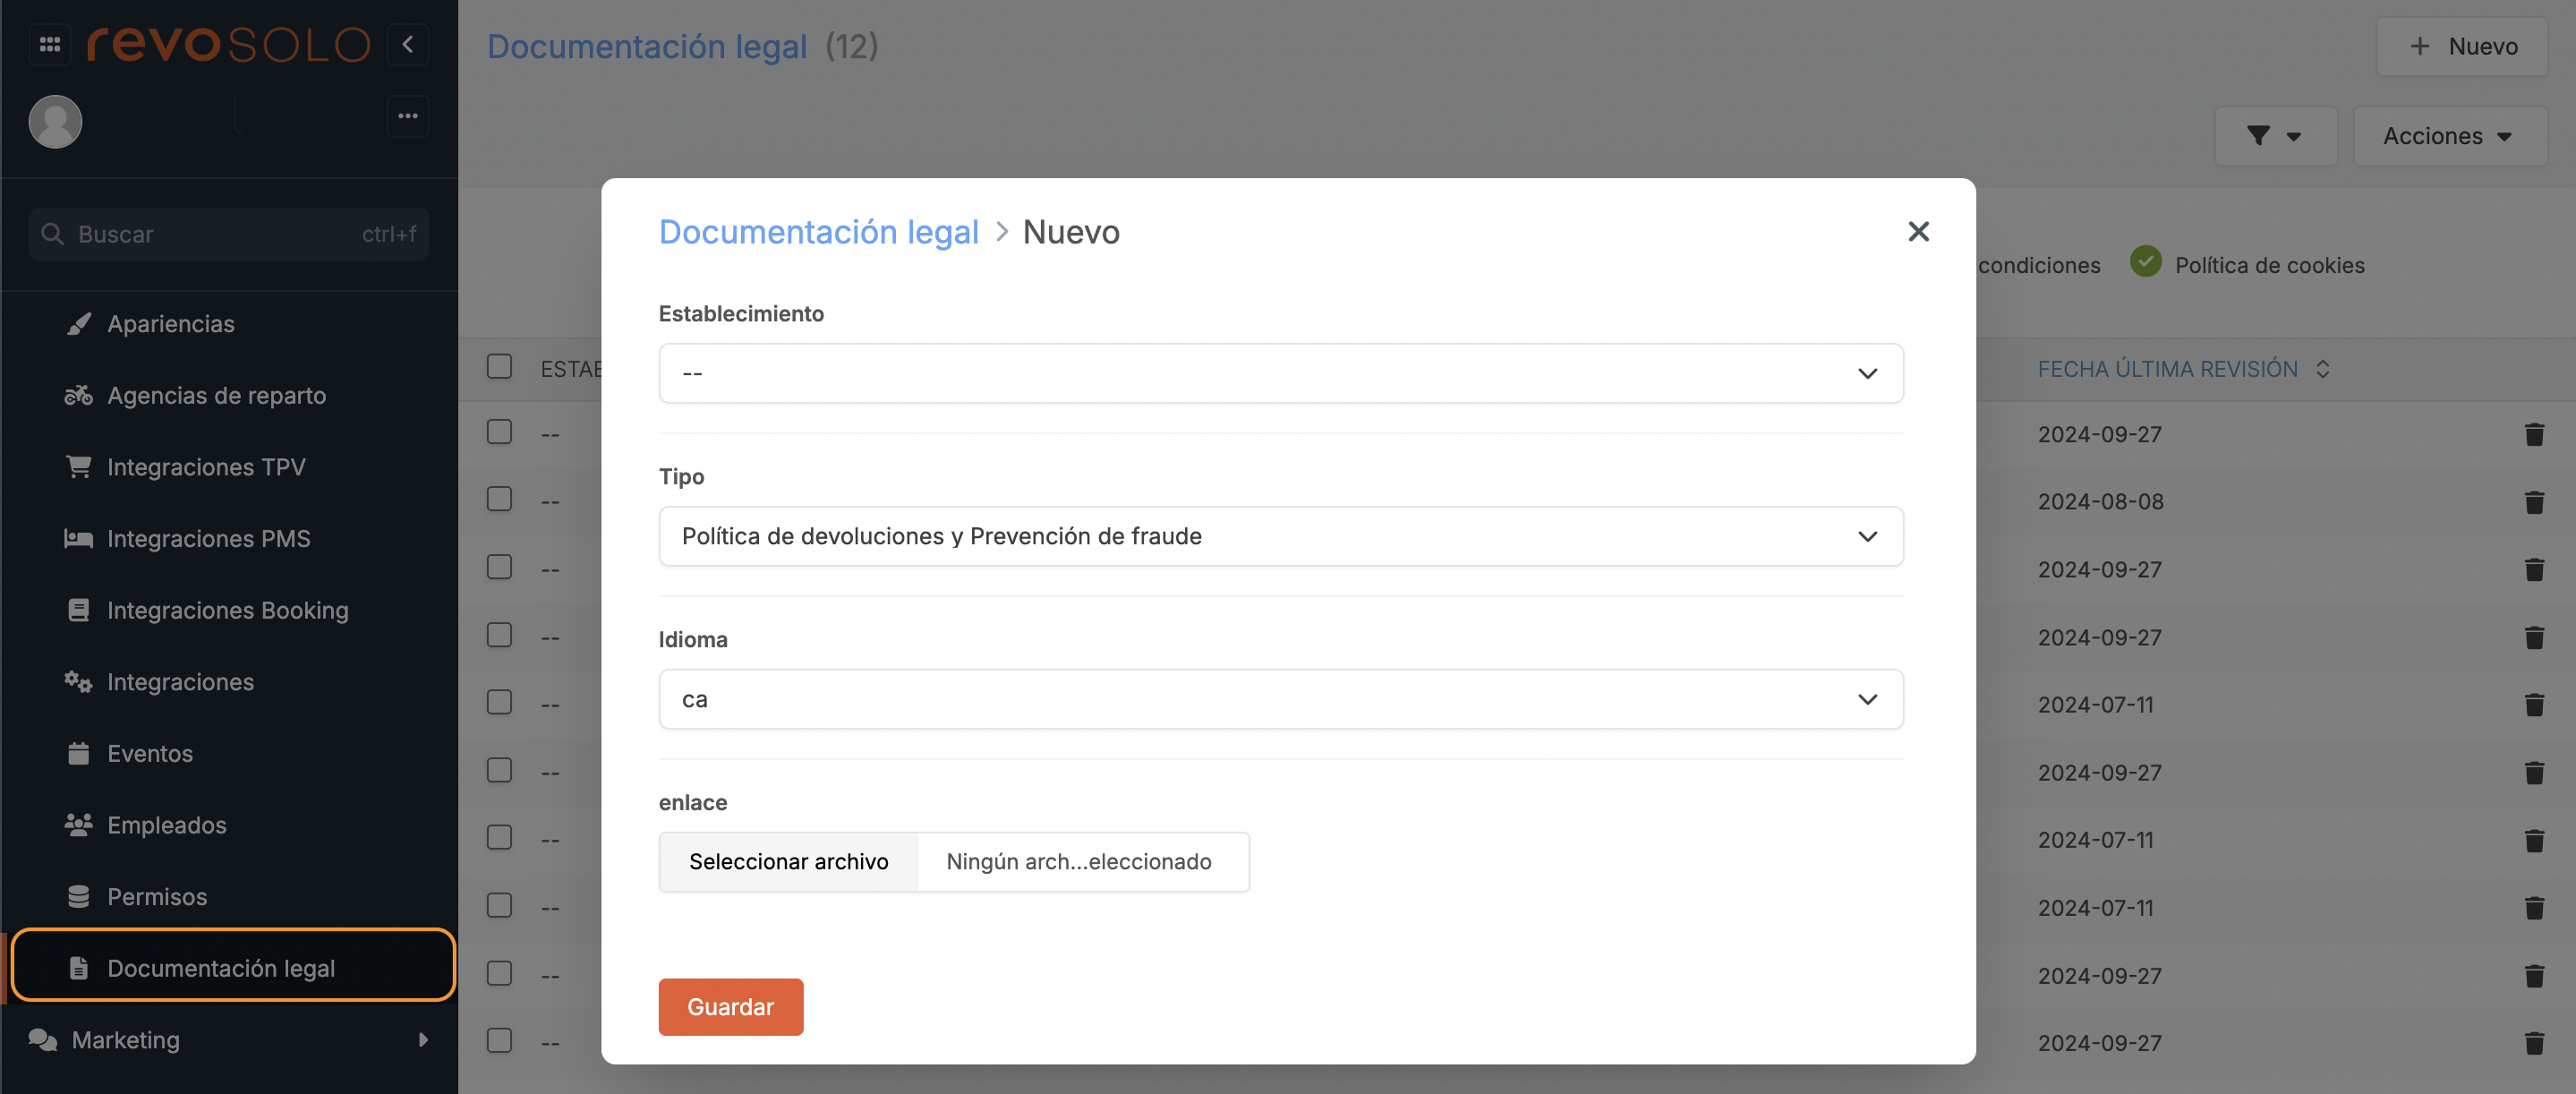
3. Fill in the fields:
- Establishment: Select one or leave blank to apply it to all.
- Type: Select “Refund policy and Fraud prevention”.
- Language: Choose a supported language.
- Link: Upload the file containing your policies.
4. Click Save.
5. Repeat the process to upload the privacy policy.
6. REVO SOLO XPRESS
6.1 HOW TO SET UP THE REDSYS PAYMENT GATEWAY IN REVO SOLO XPRESS
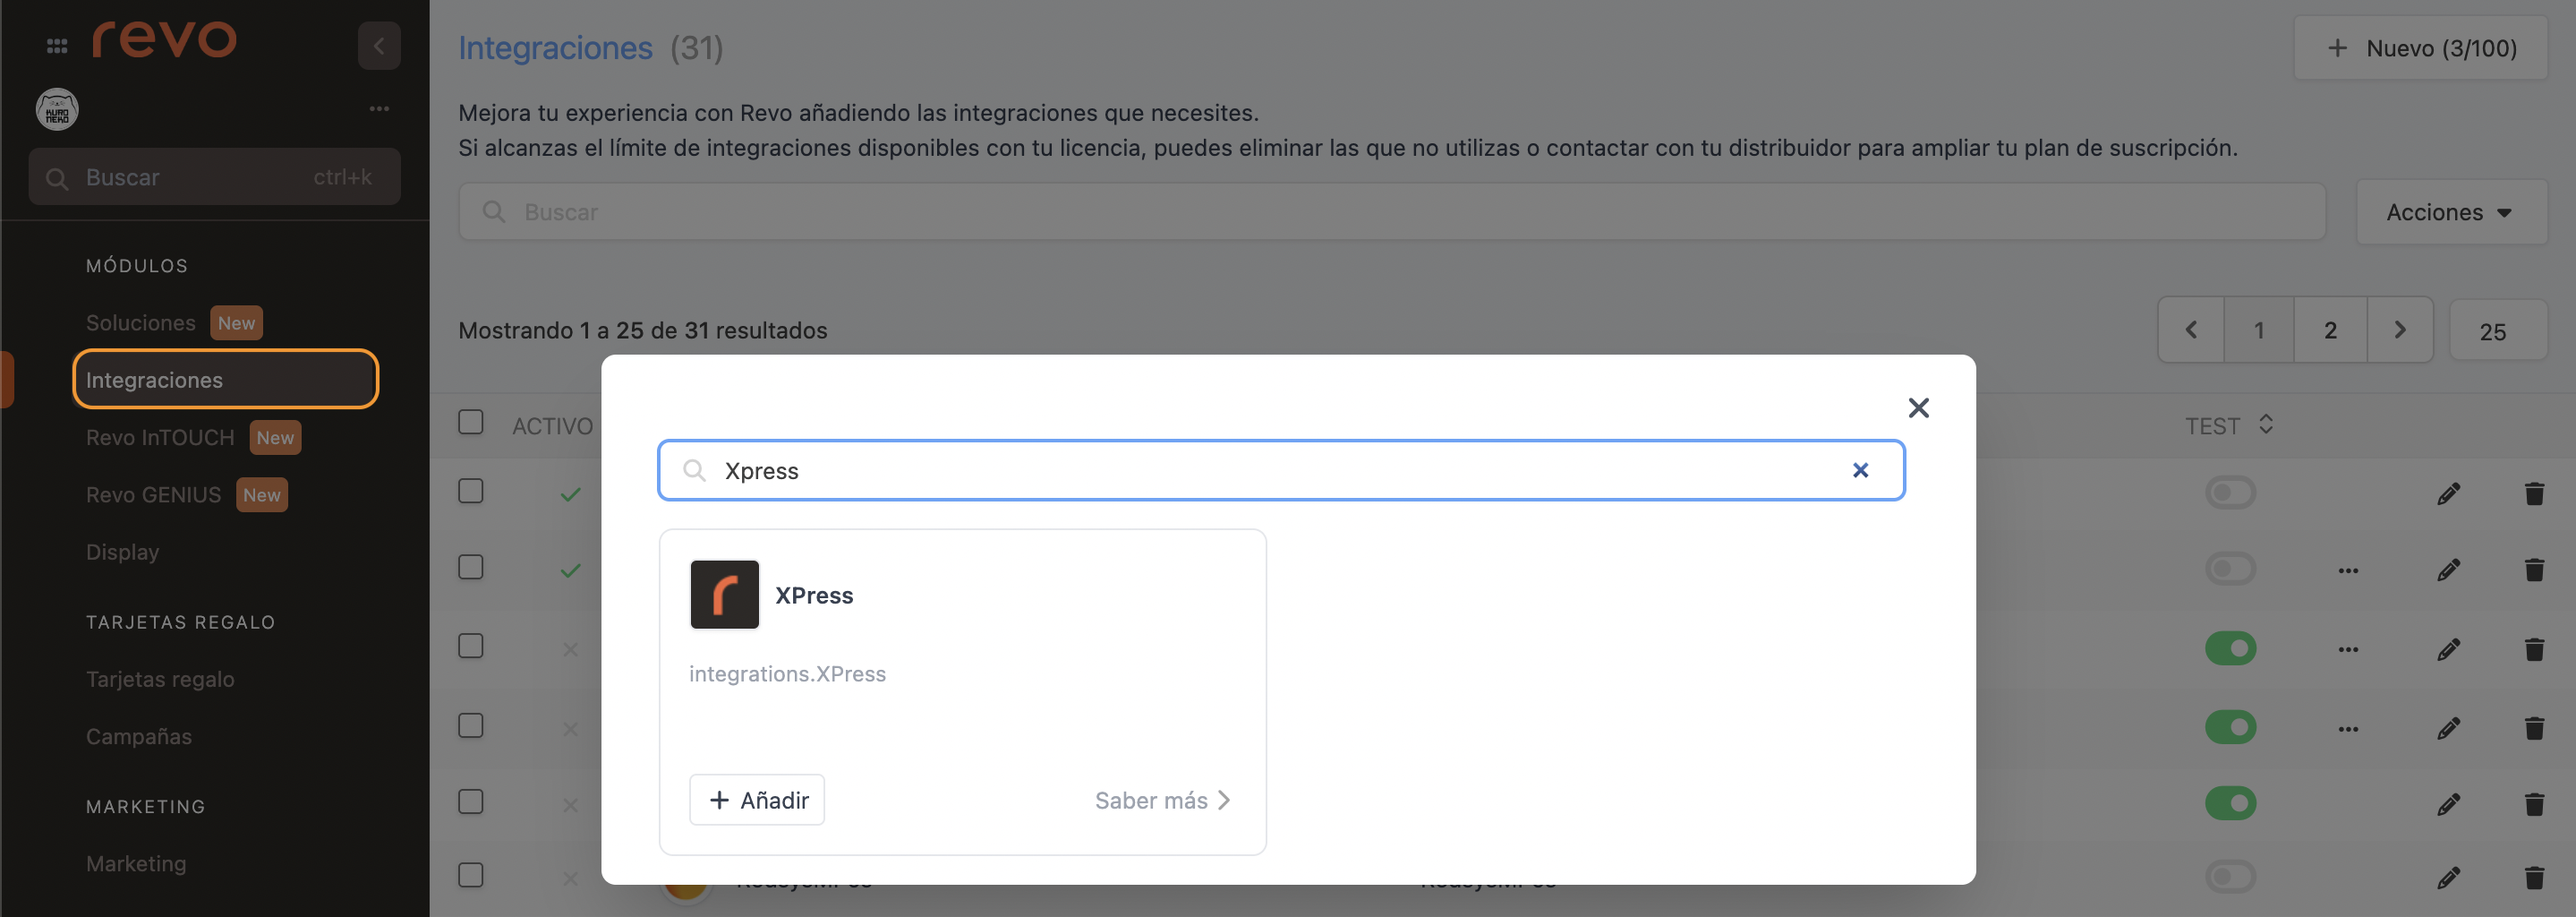
1. Log into the back office of Revo XEF.
2. Go to Integrations / INTEGRATIONS.
3. Click + New, search XPress and select + Add.
4. Fill in the following fields:
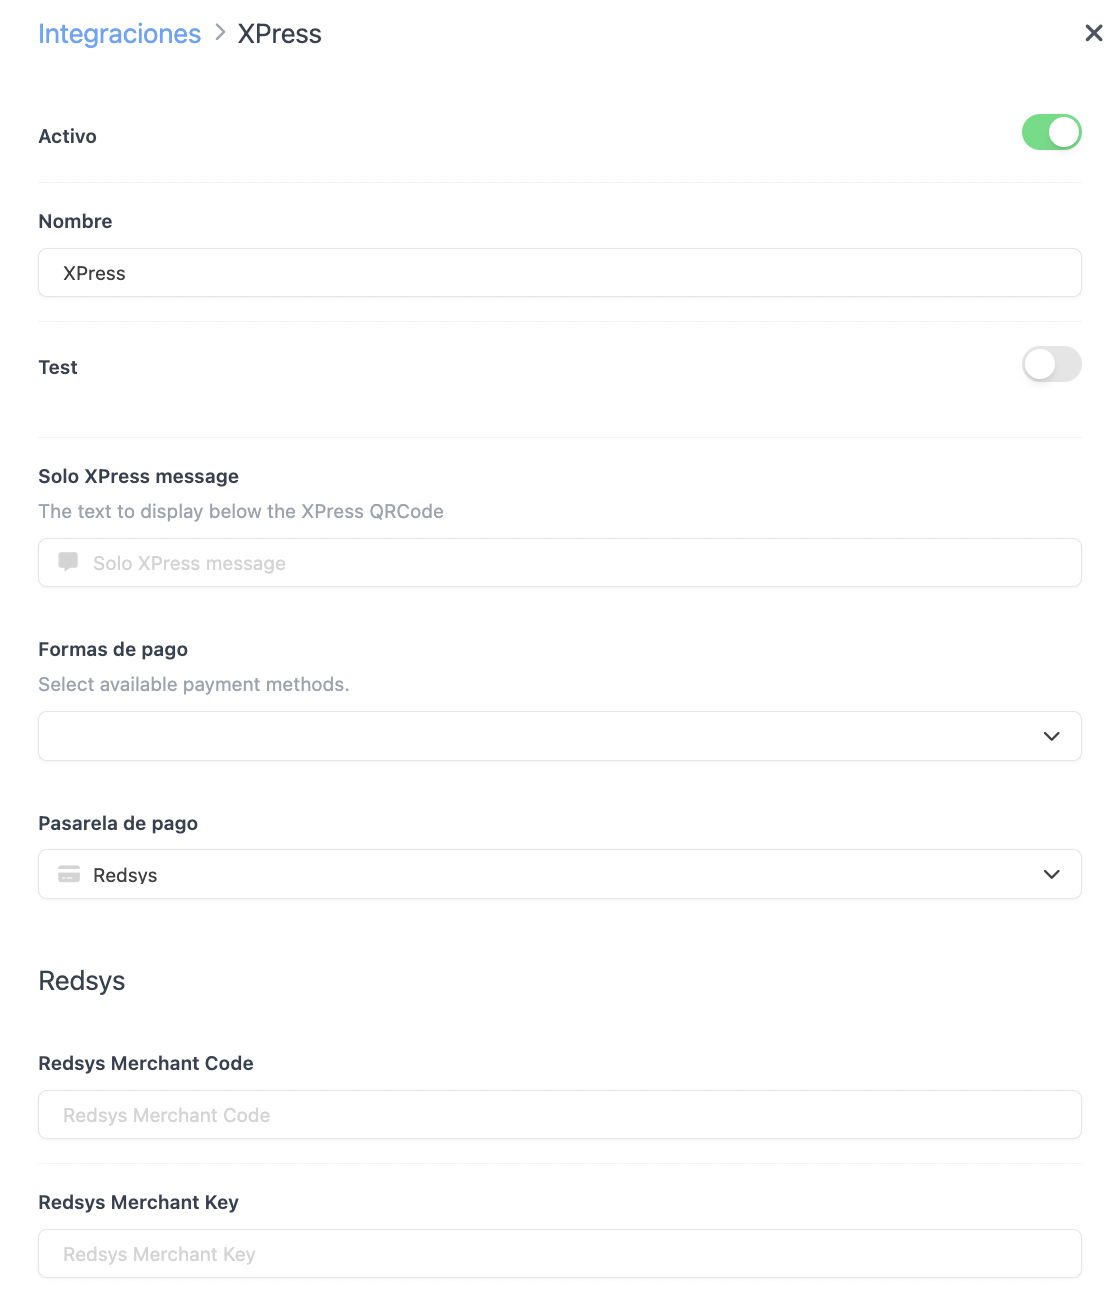
-
Active:
-
Name: Enter a name to identify the integration.
-
Test: Leave it disabled.
-
Only XPress message: Message displayed under the QR code.
-
Payment methods: Select available options.
-
Payment gateway: Redsys
-
Redsys Merchant Code: Enter your merchant number.
-
Redsys Merchant Key: Enter your secret key.
-
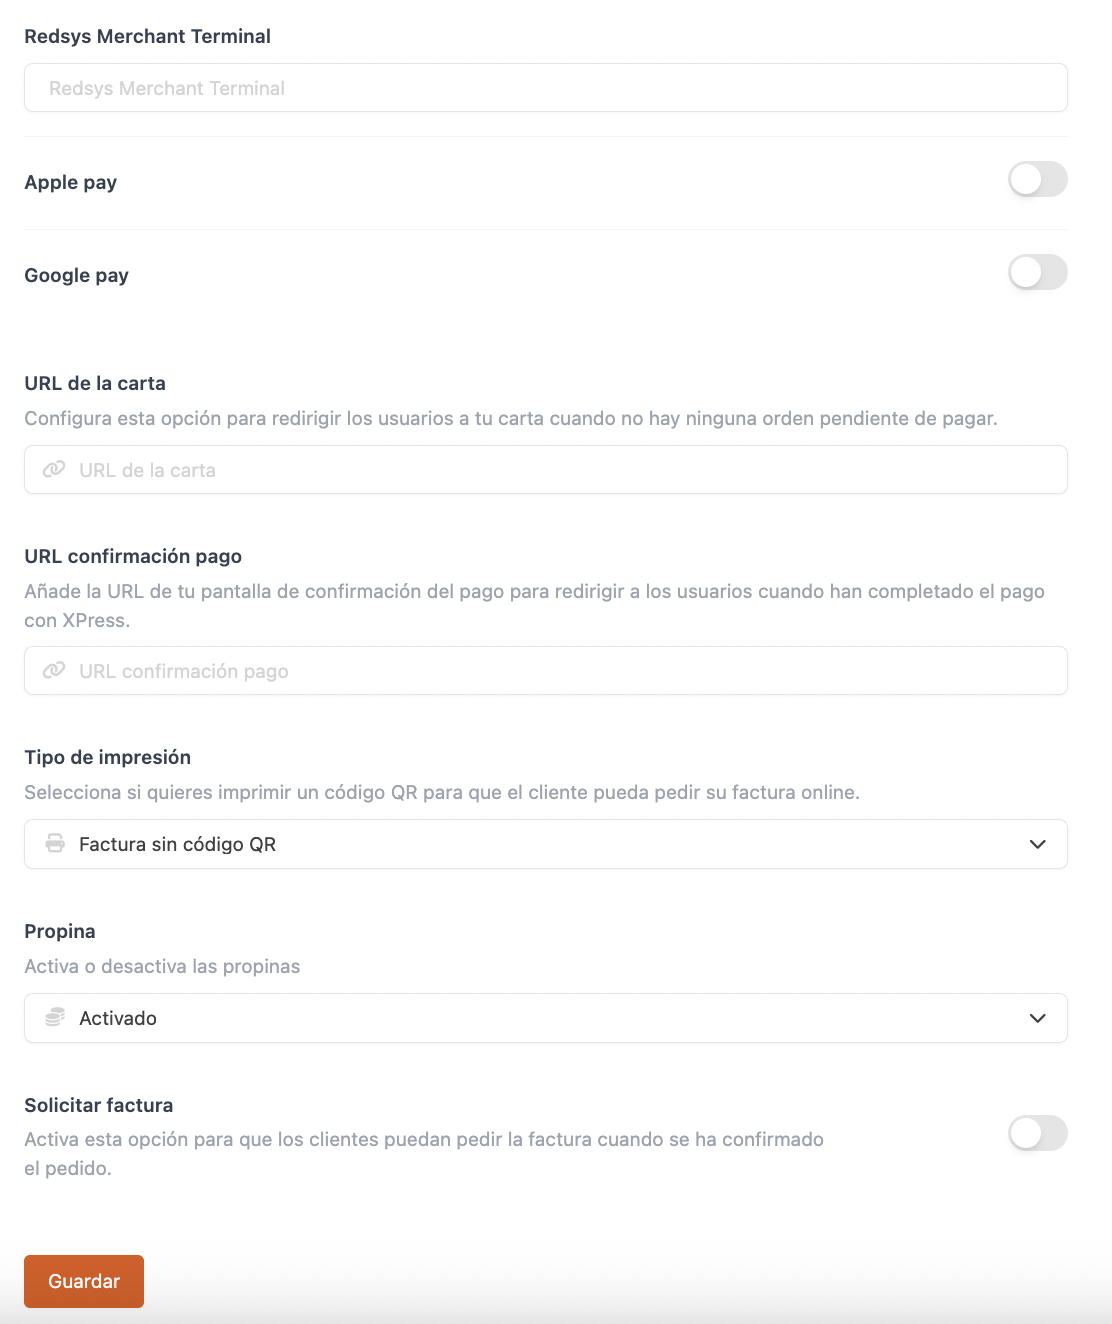
Redsys Merchant Terminal: Terminal number.
-
Apple Pay: Enable if you've provided the details from section 4.5 to the bank and Technical Support has activated the certificates.
-
Google Pay: Same as Apple Pay.
-
Menu URL: Add a URL to redirect the customer when no orders are pending.
-
Payment confirmation URL: Add your confirmation page URL, e.g. Google.
-
Print type: Choose how the QR code appears on the receipt:
- Invoice without QR code: QR is not printed.
- Invoice with QR code: QR is printed and allows entering an email to receive the invoice.
-
QR code only: Only the QR code is printed, with an option to add email for the invoice.
-
Tip: Decide whether to display a tip option during payment.
-
Request invoice: Enable if you want your customers to request an invoice when paying.
5. Click Save.
6. Click the and select Upload privacy and refund policies.

7. Upload the PDF files.
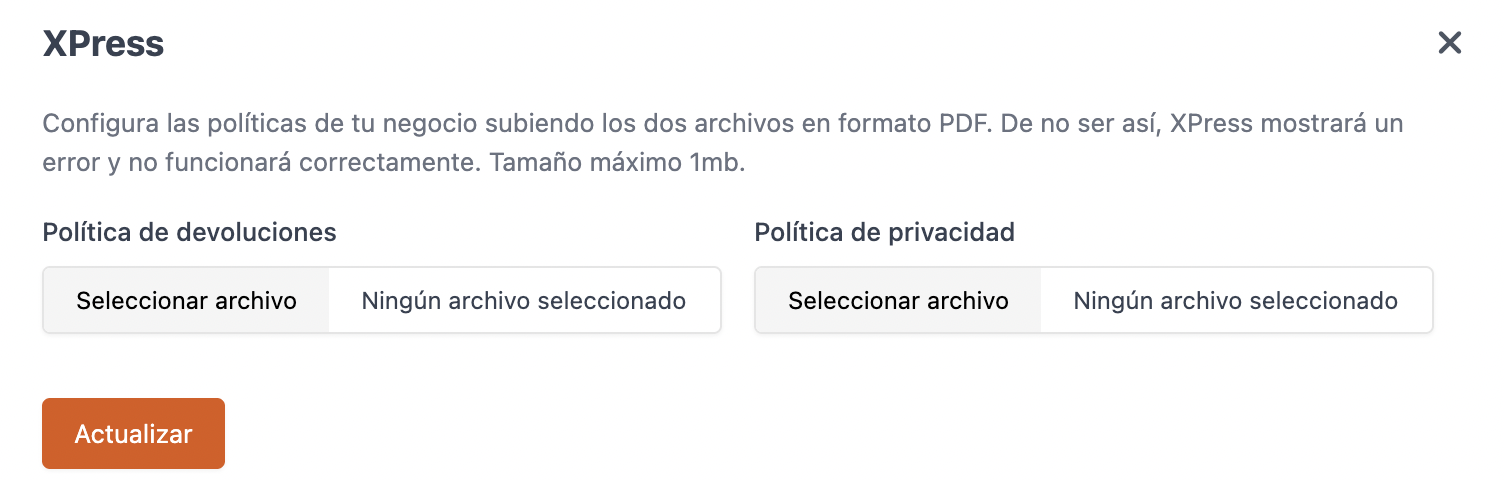
8. Click Update to save the changes.